If you're anything like me, you may have trouble seeing the numbers in the Calculator provided by Windows. I love this calculator and use it daily - but with each passing year, it's getting harder and harder for me to read the results of the calculations I perform.
After searching the internet and trying out different calculators, I've found one I like. It's called the, "Big Calculator" and you can download it for free by clicking here.
Once you get to the download web page, click the "DOWNLOAD" button (which will take you to another page). Next, click the link that reads, "External Mirro 1" in order to start the actual download.
If you're running Windows Vista or Windows 7, the downloaded program should be in your Download folder.
Once the file is downloaded, just double-left click the icon to install the new calculator. Once it's installed, you'll find it under ALL PROGRAMS in the SENSORY SOFTWARE folder. You may also find a shortcut on your desktop (that looks like a green plus sign).
The Big Calculator is a LOT easier for me to read and hopefully you'll find it easier too!

Sunday, September 30, 2012
Friday, September 21, 2012
Beware of fake computer tech calls!
Tonight my cousin got a call from somebody claiming to be a computer tech who said there was a problem with their computer and he needed to fix it for them ... the guy had a heavy accent was barely understandable .. luckily my cousin had enough smarts to tell the guy no.
Another friend of mine who lives in the D.C. area said he also had been getting similar calls for 6 months. His "tech" guy claimed to be from "the Windows Services Department". My friend has a a lot of technical knowledge and so had some fun with his calls. When told he had a problem with his computer, my friend asked the tech which one, and told him he had 6 computers. The tech told my friend he'd have to connect to tell him which one was the problem. Of course, my friend replied if you can tell me I have a problem now, why is it you can't tell me which one of the six computers is the problem. The tech hung up. They had many more conversations like this over the course of the 6 months, each time with the sound of "click" as the tech hung up in frustration.
This was obviously a scam and the guy was trying to gain remote access to the computer in order to steal important identity information or install viruses, etc.
Don't be fooled by this scam! If anybody calls you out of the blue and tries to convince you have a computer problem, tell them this call is being monitored and that you're notifying the FBI and then goodbye!
Be sure to spread the word too so that others won't fall victim to this scam!
Another friend of mine who lives in the D.C. area said he also had been getting similar calls for 6 months. His "tech" guy claimed to be from "the Windows Services Department". My friend has a a lot of technical knowledge and so had some fun with his calls. When told he had a problem with his computer, my friend asked the tech which one, and told him he had 6 computers. The tech told my friend he'd have to connect to tell him which one was the problem. Of course, my friend replied if you can tell me I have a problem now, why is it you can't tell me which one of the six computers is the problem. The tech hung up. They had many more conversations like this over the course of the 6 months, each time with the sound of "click" as the tech hung up in frustration.
This was obviously a scam and the guy was trying to gain remote access to the computer in order to steal important identity information or install viruses, etc.
Don't be fooled by this scam! If anybody calls you out of the blue and tries to convince you have a computer problem, tell them this call is being monitored and that you're notifying the FBI and then goodbye!
Be sure to spread the word too so that others won't fall victim to this scam!


Saturday, August 25, 2012
Learning to Use Excel 2007
Excel 2007 is very similar to Excel 2010. Both use the "ribbon" which was a major change to Excel from earlier versions. Below are some videos to help you learn Excel 2007 quickly! Click on the links to watch videos on YouTube.
Excel 2007 - Get up to Speed Fast
Excel 2007 - Overview
Excel 2007 - The Ribbon
Excel 2007 - Setup
Excel 2007 - Cells
Excel 2007 - Insert & Delete Rows and Columns
Excel 2007 - Creating Your First Spreadsheet
Excel 2007 - Use Simple Formulas to Do Math
Excel 2007 - Formulas
Excel 2007 - Create Charts
Excel 2007 - Create Gant Chart
Excel 2007 - Creating a Pivot Table
Excel 2007 - VLookup (Perfects for Teacheres)
Excel 2007 - Left, Mid and Find Function
Excel 2007 - Highlight Active Row
Exce; 2007 - Find and Replace Data
Excel 2007 - How to Sort Data
Excel 2007 - Filtering Data
There are hundreds of more video tutorials on YouTube teaching you how to do various things in Excel 2007. The links above are designed to help you learn the basics of Excel 2007 quickly!
Excel 2007 - Get up to Speed Fast
Excel 2007 - Overview
Excel 2007 - The Ribbon
Excel 2007 - Setup
Excel 2007 - Cells
Excel 2007 - Insert & Delete Rows and Columns
Excel 2007 - Creating Your First Spreadsheet
Excel 2007 - Use Simple Formulas to Do Math
Excel 2007 - Formulas
Excel 2007 - Create Charts
Excel 2007 - Create Gant Chart
Excel 2007 - Creating a Pivot Table
Excel 2007 - VLookup (Perfects for Teacheres)
Excel 2007 - Left, Mid and Find Function
Excel 2007 - Highlight Active Row
Exce; 2007 - Find and Replace Data
Excel 2007 - How to Sort Data
Excel 2007 - Filtering Data
There are hundreds of more video tutorials on YouTube teaching you how to do various things in Excel 2007. The links above are designed to help you learn the basics of Excel 2007 quickly!
Friday, August 3, 2012
Upgrading to Windows 8
A lot of my clients have been anxious to buy a new computer but have been concerned about the upcoming release of Windows 8. Why buy a computer with Windows 7, only to have Windows 8 come out shortly afterwards? Good question! Here's some information to help put your mind at ease!
First, if you've been wondering what's new about Windows 8, you can watch a preview video, by clicking here. Watching the video preview, it appears that Windows 8 is geared more towards social networking (i.e., communicating with others through Instant Messaging, Facebook, etc.). So if you're really into all the social networking, you'll love Windows 8! For those who aren't - no doubt Windows 8 will be an interesting experience.
The good thing is that Microsoft has FINALLY made it easier to upgrade your operating system if you're buying (or already own) a computer running Windows 7. Here's the deal ....
If you buy a new computer with Windows 7 per-installed between June 2, 2012 and January 31, 2013, you can get Windows 8 Pro for about $14.99! Of course, you still have to register before February 2013 and follow the instructions in order to take advantage of this offer ... but it really is a GOOD deal .... and you don't have to worry about buying a new computer with Windows 7 installed.
Microsoft is also offering Windows 8 to folks who have recently bought a new computer with Windows 7 installed. And by recently, I mean you have to have bought your new computer on or after June 2, 2012. If you bought your computer prior to June 2, 2012, you're out of luck! You'll have to go out and buy a retail copy of Windows 8 upgrade software if you want to upgrade.
First, if you've been wondering what's new about Windows 8, you can watch a preview video, by clicking here. Watching the video preview, it appears that Windows 8 is geared more towards social networking (i.e., communicating with others through Instant Messaging, Facebook, etc.). So if you're really into all the social networking, you'll love Windows 8! For those who aren't - no doubt Windows 8 will be an interesting experience.
The good thing is that Microsoft has FINALLY made it easier to upgrade your operating system if you're buying (or already own) a computer running Windows 7. Here's the deal ....
If you buy a new computer with Windows 7 per-installed between June 2, 2012 and January 31, 2013, you can get Windows 8 Pro for about $14.99! Of course, you still have to register before February 2013 and follow the instructions in order to take advantage of this offer ... but it really is a GOOD deal .... and you don't have to worry about buying a new computer with Windows 7 installed.
Microsoft is also offering Windows 8 to folks who have recently bought a new computer with Windows 7 installed. And by recently, I mean you have to have bought your new computer on or after June 2, 2012. If you bought your computer prior to June 2, 2012, you're out of luck! You'll have to go out and buy a retail copy of Windows 8 upgrade software if you want to upgrade.
Saturday, July 21, 2012
Tips for Labeling Photos
One of the questions I get asked a lot has to do with photos ... more specifically, "how do I keep in them in the order I want?"
The problem is that after scanning them into the computer, and arranging them in the order we want, the computer rearranges them in a different order. The problem is the same for folders and actual images. Many of my clients want to know how to fix this problem.
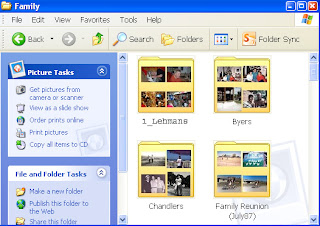 The first step in fixing the problem is understanding what causes it. And the problem is caused by the name (or label) attached the photo. For example, look at the image on the right.
It shows for folders (each containing photos). If you look closely, you'll notice that all but the first folder are in alphabetical order. The computer typically does this for me, but I can also arrange folders (and photos) alphabetically if I wish.
What this means, is that when you label a photo or scanned image, it doesn't matter how you arrange it in your computer, it will typically get rearranged alphabetically automatically. So the first thing you can do to help combat the problem is to use care when naming your scanned images. When you scan a group of images that are related to one another, make sure the name of the scanned image starts the same (e.g., family1, family2, family3, etc.).
But this only solves part of the problem. It will keep all the "family" photos together, photos can still get out of order chronologically. So for example, the photo named "family1" might have been taken in 1932, while the photo named "family2" might have been taken in 1925. Yet, because of the name convention, the photo named "family1" will get placed before the photo named "family2".
So the next step in combating the rearrangement of photos problem, is to assign a number prefix to the folder or photo. If you look at the image above again, you'll noticed that the first folder is named (or labeled), "1_Lehmans" .... and that even though "L" comes before "B", the "1_Lehmans" folder appears BEFORE the "Byers" folder. Why?
The answer is in the "1_" prefix. By placing a number followed by an underscore before the actual filename, I force that folder into a specific position on my computer. So in general, you rename your folders or photos using this naming convention to help force (and keep) them organized in a certain way on your computer.
However, while these two methods of naming files will help a lot in keeping photos organized a certain way, they're not full-proof. Another thing you can do to help organize photos, is to keep them separated in folders. For example, put each group of related photos into it's own folder. This helps to keep them separated and easier to sort through. You could even create a document to share more detailed information about the group of photos (such as when and where they were taken as well as who's in them).
Following the suggestions above for labeling your photos should help you keep them better organized.
The problem is that after scanning them into the computer, and arranging them in the order we want, the computer rearranges them in a different order. The problem is the same for folders and actual images. Many of my clients want to know how to fix this problem.
 The first step in fixing the problem is understanding what causes it. And the problem is caused by the name (or label) attached the photo. For example, look at the image on the right.
It shows for folders (each containing photos). If you look closely, you'll notice that all but the first folder are in alphabetical order. The computer typically does this for me, but I can also arrange folders (and photos) alphabetically if I wish.
What this means, is that when you label a photo or scanned image, it doesn't matter how you arrange it in your computer, it will typically get rearranged alphabetically automatically. So the first thing you can do to help combat the problem is to use care when naming your scanned images. When you scan a group of images that are related to one another, make sure the name of the scanned image starts the same (e.g., family1, family2, family3, etc.).
But this only solves part of the problem. It will keep all the "family" photos together, photos can still get out of order chronologically. So for example, the photo named "family1" might have been taken in 1932, while the photo named "family2" might have been taken in 1925. Yet, because of the name convention, the photo named "family1" will get placed before the photo named "family2".
So the next step in combating the rearrangement of photos problem, is to assign a number prefix to the folder or photo. If you look at the image above again, you'll noticed that the first folder is named (or labeled), "1_Lehmans" .... and that even though "L" comes before "B", the "1_Lehmans" folder appears BEFORE the "Byers" folder. Why?
The answer is in the "1_" prefix. By placing a number followed by an underscore before the actual filename, I force that folder into a specific position on my computer. So in general, you rename your folders or photos using this naming convention to help force (and keep) them organized in a certain way on your computer.
However, while these two methods of naming files will help a lot in keeping photos organized a certain way, they're not full-proof. Another thing you can do to help organize photos, is to keep them separated in folders. For example, put each group of related photos into it's own folder. This helps to keep them separated and easier to sort through. You could even create a document to share more detailed information about the group of photos (such as when and where they were taken as well as who's in them).
Following the suggestions above for labeling your photos should help you keep them better organized.
Tuesday, July 3, 2012
5 Ways to Reset Your Computer Password
Have a password set up to log into Windows and can't remember it? Perhaps you inherited a computer with a password already set up and have no idea what it is. These are common problems and can usually be solved pretty easily.
There are generally 5 ways to reset a password on computers running Windows:
If you're comfortable working inside a computer case, then options 1 and 2 are usually pretty easy and quick (though you may need to refer to a manual to use option #2). Working inside a computer case can be hazardous to the computer though, so if you've never done it, or aren't comfortable, I would recommend not doing it yourself. The biggest danger when working inside a computer case is discharging static to critical parts which can render the computer inoperable.
Option #3 is a safer method of resetting the computer password. Most computers today create a Admin account and hide it - this way it's there if needed later but doesn't interfere with the normal day to day operation of the computer for the user. The best way to get into the Admin account is to boot the computer to SAFEMODE. And the to do this, you need to restart the computer. Follow the instructions below to boot the computer to Safemode:
Assuming you can log into the Admin account (option #3), then resetting the computer password is easy. Just open the CONTROL PANEL and then USER ACCOUNTS. Then select the account name you want to reset the password for. Once on that account, click CHANGE PASSWORD.
The 4th option listed above, is generally a last resort option for resetting your computer password. This is because Option #4 will erase your hard drive (and any data you had stored on it).
Most computers sold in the last 5 years have a copy of the operating system hidden on a partition of the hard drive. Getting to can be easy or tricky depending on who made your computer. If you have the user guide that came with your computer, it should tell you how to restore the computer back to factory settings. If you don't have the user guide (or can't find it), you may be able to find it online at your manufacturer's web site.
Be sure to watch the screen too when you first turn your computer on. You may see a note about hitting certain keys (like F10, F11 or F12) to restore the computer settings. On some computers, you have to hit the CTRL key in addition to one of the F-keys previously mentioned. When in doubt, try all of the F-keys listed (with and without the CTRL key.
Hopefully one of the methods listed above will help your reset your computer password.
There are generally 5 ways to reset a password on computers running Windows:
- Remove the CMOS battery on the Motherboard for a few seconds and replace it
- Use a jumper to clear the CMOS settings
- Log into the Admin account (if there is one) and rest the password
- Restore the computer back to Factory Settings.
- Use a 3rd party software program (which typically costs money)
If you're comfortable working inside a computer case, then options 1 and 2 are usually pretty easy and quick (though you may need to refer to a manual to use option #2). Working inside a computer case can be hazardous to the computer though, so if you've never done it, or aren't comfortable, I would recommend not doing it yourself. The biggest danger when working inside a computer case is discharging static to critical parts which can render the computer inoperable.
Option #3 is a safer method of resetting the computer password. Most computers today create a Admin account and hide it - this way it's there if needed later but doesn't interfere with the normal day to day operation of the computer for the user. The best way to get into the Admin account is to boot the computer to SAFEMODE. And the to do this, you need to restart the computer. Follow the instructions below to boot the computer to Safemode:
- Make sure the computer is powered down (hold the power button in until it shuts off it's running)
- Turn the computer on, than hit the F8 key on the keyboard repeatedly until you get to a menu
- Chose the SAFEMODE option using the arrows on the keyboard and hit ENTER
Assuming you can log into the Admin account (option #3), then resetting the computer password is easy. Just open the CONTROL PANEL and then USER ACCOUNTS. Then select the account name you want to reset the password for. Once on that account, click CHANGE PASSWORD.
The 4th option listed above, is generally a last resort option for resetting your computer password. This is because Option #4 will erase your hard drive (and any data you had stored on it).
Most computers sold in the last 5 years have a copy of the operating system hidden on a partition of the hard drive. Getting to can be easy or tricky depending on who made your computer. If you have the user guide that came with your computer, it should tell you how to restore the computer back to factory settings. If you don't have the user guide (or can't find it), you may be able to find it online at your manufacturer's web site.
Be sure to watch the screen too when you first turn your computer on. You may see a note about hitting certain keys (like F10, F11 or F12) to restore the computer settings. On some computers, you have to hit the CTRL key in addition to one of the F-keys previously mentioned. When in doubt, try all of the F-keys listed (with and without the CTRL key.
Hopefully one of the methods listed above will help your reset your computer password.
Monday, June 4, 2012
Recycling Old Computers & Electronics
Looking to recycle old computers, TV's and other electronic equipment? Give TFS Networks a call. If you live in any of the Quad-city areas (Prescott, Prescott Valley, Dewey, and Chino Valley), they'll even come to your house to pick the stuff up.
I was pleasantly surprised by their quick response and willingness to come to my house so I didn't have to load my car up and take the equipment to them.
Their phone number is 928-925-0776. You can even schedule a pickup on line. If you're interested in recycling any old computer equipment or electronics, click here for more information and a list of acceptable items.
I was pleasantly surprised by their quick response and willingness to come to my house so I didn't have to load my car up and take the equipment to them.
Their phone number is 928-925-0776. You can even schedule a pickup on line. If you're interested in recycling any old computer equipment or electronics, click here for more information and a list of acceptable items.
Tuesday, March 27, 2012
Video Editing Tips
People who know me, know I love to create videos. Although I have a mini-video camera, many of my videos are created using still photos. I generally use Sony Vegas to create my videos, but I have used Windows Movie Maker too. Sony Vegas is my favorite video creation/editing software though.
While creating and editing videos is pretty straight forward, experience has taught me a few things and upon request, I decided to share those tips here.
In a nutshell, here are my top video editing tips .....
By default, most people store their pictures in the PICTURE folder (or in their DOCUMENT folder) and their music in the MUSIC folder, etc. While this is the preferred method for most everyday uses, it creates a problem for video editing.
The first problem is that people tend to delete, move, or rename their photos, music, video clips, etc. If that photo, song, etc. was already in your video timeline and you move, delete or rename the file, then the timeline can't find it anymore (your software will tell you it's "offline" or "missing"). This means you have to find the original file and reimport it into your video software so the timeline can see it. This can be a major pain (not to mention time-consuming).
But by COPYING these files (photos, video clips, music, etc) to a special folder (as described in steps 1-4 above), your video editing software will always know where to find them. In this case, it doesn't matter if you move, delete or rename your original files ... your timeline will remain in tact because it will know where to find the copies you created in steps 1-4.
The other big advantage in using the tips outlined above is that once the video is complete, you can copy this entire folder to your backup hard drive, flash drive or DVD and remove it from your desktop (to save disk space). But then if you ever need to make changes to the video or make more copies, you can just COPY the entire folder back to your desktop, open your video editing software and you're good to go again. The software will knows where to find everything.
Everybody has their own system, but through experience, this is the best system I've discovered for creating and editing home videos.

to create my videos, but I have used Windows Movie Maker too. Sony Vegas is my favorite video creation/editing software though. While creating and editing videos is pretty straight forward, experience has taught me a few things and upon request, I decided to share those tips here.
In a nutshell, here are my top video editing tips .....
- Create a new folder on your desktop for each video you create (one folder per video). Give the folder a name that reflects the theme of your video (example, "Christmas 2011")
- Within this folder, create sub-folders .... one for pictures (if using still photos), one for video clips (if using video clips), one for music, etc. The goal is to get all of the video, pictures, music, etc. used in your video into the same folder (away from everything else) so it's easy to find and manage.
- Copy the photos, video clips, music, etc that you intend to use in your video into their respective sub-folders which you created in step 2.
- Once you complete steps 1-3, open your favorite video editing software and IMPORT your video, photos and music from the subfolders you created in step 3.
- When you save your movie, be sure to save it in the top level folder you created on your desktop (in step 1).
- When you render (or make) your movie, be sure to save the created movie in the top level folder (step 1).
By default, most people store their pictures in the PICTURE folder (or in their DOCUMENT folder) and their music in the MUSIC folder, etc. While this is the preferred method for most everyday uses, it creates a problem for video editing.
The first problem is that people tend to delete, move, or rename their photos, music, video clips, etc. If that photo, song, etc. was already in your video timeline and you move, delete or rename the file, then the timeline can't find it anymore (your software will tell you it's "offline" or "missing"). This means you have to find the original file and reimport it into your video software so the timeline can see it. This can be a major pain (not to mention time-consuming).
But by COPYING these files (photos, video clips, music, etc) to a special folder (as described in steps 1-4 above), your video editing software will always know where to find them. In this case, it doesn't matter if you move, delete or rename your original files ... your timeline will remain in tact because it will know where to find the copies you created in steps 1-4.
The other big advantage in using the tips outlined above is that once the video is complete, you can copy this entire folder to your backup hard drive, flash drive or DVD and remove it from your desktop (to save disk space). But then if you ever need to make changes to the video or make more copies, you can just COPY the entire folder back to your desktop, open your video editing software and you're good to go again. The software will knows where to find everything.
Everybody has their own system, but through experience, this is the best system I've discovered for creating and editing home videos.
Tuesday, February 7, 2012
Kindle Fire versus Laptop
Many of my clients only use the computer to read email, check facebook and surf the web a little. They don't do pictures, or music or even play many games. If you fit into this category, you may want to consider getting a Kindle Fire instead of a laptop. Why???
The Kindle Fire lets you connect to the Internet so you can check email and surf the web, but also gives you the added advantages of a lightweight, easy to carry computer which you can also read books on. So in essence, you kind of have the best of both worlds ... being able to read while still having a way to check email, facebook and surf the web.
Kindle Fire's are especially useful when traveling! You don't have to bulky books to read, and you can stay connected to friends and family at home with one handy easy to carry gadget!
To learn more about the Kindle Fire, click here!
The Kindle Fire lets you connect to the Internet so you can check email and surf the web, but also gives you the added advantages of a lightweight, easy to carry computer which you can also read books on. So in essence, you kind of have the best of both worlds ... being able to read while still having a way to check email, facebook and surf the web.
Kindle Fire's are especially useful when traveling! You don't have to bulky books to read, and you can stay connected to friends and family at home with one handy easy to carry gadget!
To learn more about the Kindle Fire, click here!
Saturday, January 21, 2012
Getting Help with Microsoft Word
A lot of my clients struggle using Microsoft Word, so I thought I'd offer some helpful links below.
Hopefully the links above will be helpful to you in figuring out how to use Word effectively!
Hopefully the links above will be helpful to you in figuring out how to use Word effectively!
Sunday, January 1, 2012
Understanding the New Facebook Timeline
Unfortunately for many of us, Facebook is about to roll out a new change on everybody called Timeline. You may have noticed that some of your friends have already voluntarily switched over. And in keeping with Facebook's "I don't care what the user wants" attitude .... we'll all be getting the time very soon.
This new change will be so different that it will take longer to learn and understand what's going on than previous changes to Facebook. Here's a brief introduction of the new Timeline profile.
And should you decide to stay with Facebook after this new change, the links below should help you navigate the new timeline quicker.
Facebook Changes Again - Everything You Need to Know
Facebook Timeline - Old Profiles verses New Timeline Profiles
10 Things You Should Know About Facebook Timeline
Preps for Facebook's Timeline Layout - 6 Must Do Privacy Tweaks
How to Get Your Facebook in Order
Hopefully the links above will help you adjust to Facebook's new timeline profile quicker. But just in case you're one of the many users who are ready to sever your relationship with Facebook, you can always cancel your Facebook Account by clicking here.
This new change will be so different that it will take longer to learn and understand what's going on than previous changes to Facebook. Here's a brief introduction of the new Timeline profile.
And should you decide to stay with Facebook after this new change, the links below should help you navigate the new timeline quicker.
Facebook Changes Again - Everything You Need to Know
Facebook Timeline - Old Profiles verses New Timeline Profiles
10 Things You Should Know About Facebook Timeline
Preps for Facebook's Timeline Layout - 6 Must Do Privacy Tweaks
How to Get Your Facebook in Order
Hopefully the links above will help you adjust to Facebook's new timeline profile quicker. But just in case you're one of the many users who are ready to sever your relationship with Facebook, you can always cancel your Facebook Account by clicking here.
Friday, December 16, 2011
What is One Note in Microsoft Office?
If you're using Microsoft Office 2007 or a later version, you may have noticed a new program called, One Note. This is a new program in the Microsoft Office Suite. A lot of my clients have asked me about it, so I thought I'd provide some information here about One Note.
Unlike Microsoft Word (which is a word processing program), One Note was designed to help you track and organize important notes. Many of us are often scribbling notes on various pieces of paper, which often get lost or are difficult to keep track of. One Note is a digital program designed to replace all those notes scribbled little pieces of papers. And even better, it helps you organize your important notes so they're always at your fingertips.
You can watch a demo video showing how One Note works by clicking here.
For more information about One Note, click here.
Thursday, December 8, 2011
Beware of Fake Adobe Software Update
Although I typically tell my clients it's okay to update Adobe when they see a notification to do so, I want to issue a caution regarding those updates. There is currently a FAKE update message making the email rounds and folks definitely want to IGNORE and DELETE this warning.
Legitimate update notices show up in the taskbar (you'll see a little message window down in the corner of the screen by the clock). It's OKAY (and advised) to respond to these messages and update your Adobe software.
However, NEVER respond to update notices received via emails. These are almost always scams. And of course, if you're ever in doubt, don't respond to messages asking you to update. Instead, go the software application's website and download the latest version of the software and install it. This will ensure you're always updated and eliminate the risk of getting caught in a scam.
Legitimate update notices show up in the taskbar (you'll see a little message window down in the corner of the screen by the clock). It's OKAY (and advised) to respond to these messages and update your Adobe software.
However, NEVER respond to update notices received via emails. These are almost always scams. And of course, if you're ever in doubt, don't respond to messages asking you to update. Instead, go the software application's website and download the latest version of the software and install it. This will ensure you're always updated and eliminate the risk of getting caught in a scam.
Monday, November 21, 2011
Norton Internet Security for 5-PC's
For the last few years, Norton has offered a 3-PC license (meaning you could legally install Norton Internet Security on 3 computers). This is a huge help to folks who own more than one computer. And as amazing as it sounds, many users now need a 5-pc license (especially if you have kids in the house with laptops)!
Buying Internet Security software for 5 computers can get expensive. But thank to Norton's 5-PC license for Norton Internet Security, this is no longer a problem.
A single PC license for Norton Internet Security costs $30-$40 (depending on where you buy it)
The 3-PC license for Norton Internet Security costs $70
And the 5-PC license for Norton Internet Security only costs about $109 (which is a huge savings).
To downnload the Norton Internet Security 2012 - 5 User Pack, click here.
Buying Internet Security software for 5 computers can get expensive. But thank to Norton's 5-PC license for Norton Internet Security, this is no longer a problem.
A single PC license for Norton Internet Security costs $30-$40 (depending on where you buy it)
The 3-PC license for Norton Internet Security costs $70
And the 5-PC license for Norton Internet Security only costs about $109 (which is a huge savings).
To downnload the Norton Internet Security 2012 - 5 User Pack, click here.
Uninstalling Skype
If you're no longer using Skype or are having trouble with the program, you want to uninstall it. The steps below will help you uninstall Skype from computers running Windows.
If you still wish to use Skype but find the program isn't working anymore or freezes up on you. Then you may wish to try uninstalling it and then reinstalling the latest version of Skype. This may fix the problem.
Once Skype is uninstalled, you can reinstall the latest version if you like. To download the latest version of Skype, click here. You'll be asked to log in to your existing Skype account or create a new one.
For more information about using Skype, click here.
If you still wish to use Skype but find the program isn't working anymore or freezes up on you. Then you may wish to try uninstalling it and then reinstalling the latest version of Skype. This may fix the problem.
To uninstall Skype from computers running WinXP:
- Click the START BUTTON and then CONTROL PANEL
- Open ADD OR REMOVE PROGRAMS
- Scroll own the list (when it becomes available) and find Skype
- Highlight Skype (single-left click) and then click the REMOVE button (and follow any prompts); Reboot the computer if asked to.
To uninstall Skype from computers running Windows Vista and 7:
- Click the START BUTTON and CONTROL PANEL
- Open PROGRAMS and FEATURES
- Find Skype in the list of programs and highlight it
- Click the UNINSTALL or REMOVE button
Once Skype is uninstalled, you can reinstall the latest version if you like. To download the latest version of Skype, click here. You'll be asked to log in to your existing Skype account or create a new one.
For more information about using Skype, click here.
Setting Up Skype
Skype is a great tool that allows you to video chat or talk to others anywhere in the world ... and it's FREE! Skype has been around for years, but more and more people are catching on to it now that they have web cams built into their laptops.
Although you don't need to have a web cam to use Skype, it is recommended. Without the web cam, all you can do is chat over the internet as if you were talking on a telephone. So at very least you will need a microphone connected to your computer to chat. And if you prefer, you can purchase a special headset/microphone combo specifically designed to work with Skype.
Webcams aren't that expensive these days and having one allows you to actually see the person (or persons) you're chatting with real-time (and vice versa). The cool thing about this is that it's almost like being there in person! Many of my clients feel as though they get to watch their distant grandchildren grow because of Skype.
If you have a lot of relatives and friends that live in other states or counties, you'll really enjoy Skype. And it's easy to install and set up.
Installing Skype is pretty easy. You'll have to set up a free account first, then download the software and install it. I recommend keeping notes of the username and password you setup for future reference. In addition to the free account, Skype also offers a premium account for a small fee. You can read about the differences in accounts on the Skype website.
If you previously had Skype installed and can't get the program to work anymore, you might want to uninstall Skype and then reinstall the latest version.
To download Skype, click here.
Once the file is downloaded, double-click the icon to start the install process. Follow the prompts to complete the installation.
Once the program is installed and you open it, you'll be asked to check the sound and video settings. Once that's done, you'll need to add others with Skype to your address book. You can search for them using the built in search tool or just ask your friends and relatives for their skype names and add them. If they're a little more tech savvy, you can also give them your skype name and ask them to add you.
When you add somebody to your Skype contact list, a message is sent to the other person asking for you to confirm it's okay. This way you're only adding people to your contact list you want.
Once you have a contact or two, you need to make sure that person is online so you can contact them. Skype will tell if the other person is online. If you like, you can also schedule a call with somebody in advance to make sure you're both online at the same time.
For more help with Skype, click here.
Although you don't need to have a web cam to use Skype, it is recommended. Without the web cam, all you can do is chat over the internet as if you were talking on a telephone. So at very least you will need a microphone connected to your computer to chat. And if you prefer, you can purchase a special headset/microphone combo specifically designed to work with Skype.
Webcams aren't that expensive these days and having one allows you to actually see the person (or persons) you're chatting with real-time (and vice versa). The cool thing about this is that it's almost like being there in person! Many of my clients feel as though they get to watch their distant grandchildren grow because of Skype.
If you have a lot of relatives and friends that live in other states or counties, you'll really enjoy Skype. And it's easy to install and set up.
Here's what you need for Skype:
- A computer (obviously) with a good high-speed internet connection (note some folks on DSL have trouble)
- A microphone and speakers (or headset) ... or a web cam (which typically has the microphone built in)
Installing Skype:
Installing Skype is pretty easy. You'll have to set up a free account first, then download the software and install it. I recommend keeping notes of the username and password you setup for future reference. In addition to the free account, Skype also offers a premium account for a small fee. You can read about the differences in accounts on the Skype website.
If you previously had Skype installed and can't get the program to work anymore, you might want to uninstall Skype and then reinstall the latest version.
To download Skype, click here.
Once the file is downloaded, double-click the icon to start the install process. Follow the prompts to complete the installation.
Getting Started with Skype:
Once the program is installed and you open it, you'll be asked to check the sound and video settings. Once that's done, you'll need to add others with Skype to your address book. You can search for them using the built in search tool or just ask your friends and relatives for their skype names and add them. If they're a little more tech savvy, you can also give them your skype name and ask them to add you.
When you add somebody to your Skype contact list, a message is sent to the other person asking for you to confirm it's okay. This way you're only adding people to your contact list you want.
Once you have a contact or two, you need to make sure that person is online so you can contact them. Skype will tell if the other person is online. If you like, you can also schedule a call with somebody in advance to make sure you're both online at the same time.
For more help with Skype, click here.
Monday, November 14, 2011
Finding Duplicate Photos
One of the questions I'm frequently asked is how to find and delete duplicate photos. Most people are looking for a great program that will automate the process for them. And while you can by software programs to do the job, I've never trusted them too much.
In the age of digital photography, photos are often irreplaceable and the last thing I want to do is accidentally delete photos I'd like to keep. For this reason, I always prefer to find and delete duplicate photos manually.
And one of the easiest and quickest ways to do this, is to search your entire hard drive for all photos using the "search" or "find" tool in Windows. You don't even have to know the name of each photo. You can tell Windows to search for all JPG or BMP or GIF files on your computer and then sit and wait for the results.
Here's the steps to search for duplicate photos on your computer:
For computers running Windows Vista or 7, follow the steps below to find duplicate photos:
Note also, that it may be a good idea to check the file sizes before deleting duplicate images. This will help you make sure you delete the smaller image (if one exists) and save the higher resolution image. You can check file sizes by resting your cursor over the image and reading the information box that pops up. Note that for most users having duplicate images of different file sizes may not be a problem. But for those of us that do a lot of photo editing, it may be.
Once you go through the steps a few times, you'll find this process really isn't too time consuming. But the nice thing is that you have total control over which pictures are deleted as opposed to trusting a software program to delete the right photos.
In the age of digital photography, photos are often irreplaceable and the last thing I want to do is accidentally delete photos I'd like to keep. For this reason, I always prefer to find and delete duplicate photos manually.
And one of the easiest and quickest ways to do this, is to search your entire hard drive for all photos using the "search" or "find" tool in Windows. You don't even have to know the name of each photo. You can tell Windows to search for all JPG or BMP or GIF files on your computer and then sit and wait for the results.
Here's the steps to search for duplicate photos on your computer:
- Click the START button on select SEARCH (WinXP)
- Click the PICTURES, MUSIC, OR VIDEOS link and then place a check mark in the PICTURES box
- Sit and wait for results
- View the images in thumbnails so you can see them better. To do this, click VIEW on the menu and then THUMBNAILS.
- Also a good idea to re-arrange the images by name. To do this, click VIEW on the menu and then ARRANGE ICONS BY, and then NAME.
For computers running Windows Vista or 7, follow the steps below to find duplicate photos:
- Click the START button and in the search box below type, *.jpg (and hit enter)
- You can change the size of the thumbnails by clicking the "Change Your View" icon on the right side of the window. Click the down-arrow and select the size of the thumbnail you'd like see.
Note also, that it may be a good idea to check the file sizes before deleting duplicate images. This will help you make sure you delete the smaller image (if one exists) and save the higher resolution image. You can check file sizes by resting your cursor over the image and reading the information box that pops up. Note that for most users having duplicate images of different file sizes may not be a problem. But for those of us that do a lot of photo editing, it may be.
Once you go through the steps a few times, you'll find this process really isn't too time consuming. But the nice thing is that you have total control over which pictures are deleted as opposed to trusting a software program to delete the right photos.
Wednesday, September 21, 2011
Moving Column's & Rows in Excel 2010
Ever wanted to move an entire column or row of data in an excel spreadsheet without over-writing data in another column or row? Well, you can! And here's how!
 Open your excel spreadsheet. I'm assuming you have some columns (or rows) set up already with data in them.
Let's say you'd like to move Column O and place it before Column N. To do this, you need to highlight column O first by single left-clicking on the column header (on "O" in this case). The example shows the column already highlighted.
Next, hold down the SHIFT key and move your mouse over the line between column N and O. When you do, your mouse cursor will change to a cross like that shown on red in the example.
Note that your cross will NOT be red or even this big. It will be small and black. I only made it red and bigger in this example so you could see it better.
When you see the cross, left click it (you must still be holding the shift key down when you click it) and then drag the column where you want and let go of the mouse. If done properly, it should have been inserted between other columns where you specified.
If it didn't work, a mistake was made during the process. Here's a list of common mistakes:

Let's say you'd like to move Column O and place it before Column N. To do this, you need to highlight column O first by single left-clicking on the column header (on "O" in this case). The example shows the column already highlighted.
Next, hold down the SHIFT key and move your mouse over the line between column N and O. When you do, your mouse cursor will change to a cross like that shown on red in the example.
Note that your cross will NOT be red or even this big. It will be small and black. I only made it red and bigger in this example so you could see it better.
When you see the cross, left click it (you must still be holding the shift key down when you click it) and then drag the column where you want and let go of the mouse. If done properly, it should have been inserted between other columns where you specified.
If it didn't work, a mistake was made during the process. Here's a list of common mistakes:
- The shift key wasn't held down throughout the process
- The column or row wasn't grabbed in the right spot (note you can't grab the column or row from the header, you must move farther down in the row of column to grab it). If you move your mouse on the line between the rows or column, your mouse will look different if you do it on cells than if you did it on the headers.
- The mouse was released in the wrong spot (so the column didn't go where you wanted it to).
Sunday, April 3, 2011
Can't Install AVG? - Try This!
Yesterday, I tried to update AVG software on a client computer from AVG 9.0 to AVG 2011. Naturally, the first thing I did was uninstall the old AVG and then downloaded the newest version. I've done this countless times in the past without any problems ... but yesterday was a different story.
When I clicked the AVG 2011 icon to install the program, the install window opened and told me it was installing and to be patiently ... then after a couple of minutes, the window would close, and it AVG was NOT installed. I had done everything right, the new version just wouldn't install and there weren't any error messages to help me figure out why.
After much frustration, I finally found some advice from an AVG rep on a forum. And best of all, it worked! So if you're having the same problem I did, you might want to try these steps.
When I clicked the AVG 2011 icon to install the program, the install window opened and told me it was installing and to be patiently ... then after a couple of minutes, the window would close, and it AVG was NOT installed. I had done everything right, the new version just wouldn't install and there weren't any error messages to help me figure out why.
After much frustration, I finally found some advice from an AVG rep on a forum. And best of all, it worked! So if you're having the same problem I did, you might want to try these steps.
- Download the AVG Remover tool and run it to completely remove AVG from the system. Even though this web page says to remove certain folders after running the tool, I didn't have to do this. It's a good idea to reboot the computer after running the tool though.
- Next, download the FULL version of AVG 2011 software (not the small installer program you usually download). You'll have to know if you're computer is a 32-bit or 64-bit system and select the appropriate software to download.
Sunday, March 20, 2011
Removing Facebook Scam Apps
There's another new scam making the rounds on Facebook tonight. This one is a new "Teacher from Behind"
video. These types of scams entice you with provocative messages to click on their links and then gain access to your profile information. Other similar Facebook scams include:
If however, you find that you or one of your friends have clicked a scam link on Facebook, here's what you need to do:
video. These types of scams entice you with provocative messages to click on their links and then gain access to your profile information. Other similar Facebook scams include:
- See Who's stalking you on Facebook
- Valentine's Day Scam
- Japanese Tsunami video
- Guy that Lives on my street killed his girlfriend today
If however, you find that you or one of your friends have clicked a scam link on Facebook, here's what you need to do:
- Log into your Facebook account
- In the blue navigation bar, click ACCOUNT and then PRIVACY SETTINGS
- Next to "Apps You Use" is a button that reads, EDIT SETTINGS (click this button)
- Scroll down the list and find the scam application and click the "X" to remove it. Feel free to remove any other applications you may no longer be using.
Subscribe to:
Posts (Atom)