Thursday, July 22, 2010

How to Delete Your Facebook Account

Many people choose to remove themselves from Facebook for various reasons.  When you get ready to do this, there are two options available.   You can choose to Deactivate your account or Delete it all together.
The difference is that "deactivating" your account allows you to change your mind later, while "deleting" it doesn't.

Deactivating Facebook Account

Deactivating your account changes your settings so that nobody can see your profile or contact you.  You're sort of invisible as far as others are concerned, but you are still there. Deactivating your account is easy.  Just log into your account and ....
  1. Click ACCOUNT and ACCOUNT SETTINGS.  
  2. Scroll down to the bottom of the page and click "Deactivate".
Note that one of the potential problems with "deactivation" is that Facebook is notorious for making concealed changes and it's possible that a future change may upset the balance with your deactivation settings and inadvertently make your profile public again.


Deleting Facebook Account

Deleting your Facebook account removes EVERYTHING - your profile, pictures, videos ... everything.  You will cease to exist on facebook.  If you decide go back, you'll have to create the account from scratch again.  Facebook really hates to lose people, so they tend to hide the information telling you how to delete your account.  But if you click the button below, you'll be directed to a page that will let you delete your Facebook Account.  Click the "Submit" button to delete the account.

Click here to Delete Your Facebook Account

For more information about deleting your facebook account, click here

How to Stop Facebook From Emailing You!

Tired emails from Facebook?  As great as facebook can be, having your inbox constantly flooded with facebook emails gets annoying pretty fast.   The good news is that you can configure facebook not to send those emails.  Here's how ....
  1. Log into your Facebook Account
  2. Select ACCOUNT and then ACCOUNT SETTINGS on the blue bar at the top of page.
  3. Click the NOTIFICATIONS tab
  4. Look at every setting and UNCHECK the box under the Email column (for one or more items listed). 
  5. Click SAVE CHANGES at the bottom of the page. 
Facebook lets you specify which emails you'd like to receive (if any).  By default, every item is checked, which means you'll get loads of emails.  Facebook will not send emails for items NOT CHECKED.  

Monday, July 12, 2010

Changing Your Privacy Settings in Facebook

One of the biggest annoyances of Facebook is that they are constantly making changes - many of which affect your privacy.  Sadly, too often, you have learn about these changes from somebody else (not facebook).

Today, one of my friends mentioned that Facebook is now making our phone numbers public (by default) unless we go in and change them.   So I did some checking.

Facebook generally has 3 different options for privacy.  You can either share all of your information (including profile, photos, videos, etc.) with .....
  • Everyone
  • Friends only
  • Friends of Friends

Unless you're a celebrity or business person, you typically don't want everybody to see your information.  So selecting the "Friends only" option is good for most Facebook information.  When sharing photos, I usually select "friends of friends" so that if my friend wants to share my photos with their friends, they'll be able to see them. 

However, there is definitely some information you want to keep just to yourself.  And you will have to manually set these options.

Changing your privacy settings in Facebook is tricky (especially since the steps keep changing).  But as of today, here's the steps.
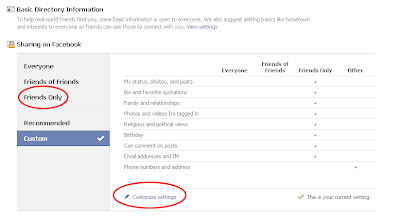
  1. Log into Facebook on select ACCOUNT and then PRIVACY SETTINGS (blue bar at the top of the page)
  2. By default, you'll see a mixture of privacy settings.  For now, click FRIENDS ONLY on the left menu of options.

  1. Now select click the link that reads, Custom Settings
  2. If you've selected "Friends Only" previously, then you may only have to change the settings under "Contact Information" - but be sure to check every setting yourself to make sure you are only sharing information you want to with the people you want to.
  3. To change your settings, click the gray button next to each setting and select the option you want.  If you want to set it so only you (and not your friends) see something, click CUSTOM and then use the pull-down arrow to select JUST YOU. Then click the SAVE SETTINGS button.
  4. Repeat the process for each privacy setting.

Because Facebook has a habit of making frequent changes to their system, it would be a good idea to re-check these settings periodically to make sure they're configured correctly.

For more information about Facebook Privacy, click here.