Friday, February 27, 2009

Beware of Norton's Automatic Renewal Feature

If you use Norton Software, you probably have a Norton Account (which is usually created the first time you install Norton software). Having the account is nice because it keeps tracks of your product keys (which many of tend to lose) and other important information about our subscription.

However, Norton has recently started incorporated an "automatic renewal" feature in these accounts - which has a tendency to charge your credit about a month before your subscription ends. By default, this feature is enabled.

Norton will gladly disable this feature in your account if you ask them too - but YOU HAVE TO ASK! There's no way for you to change turn off automatic renewal yourself.

The easiest way to contact Norton is to use their online chat support. The link is listed below.

http://www.symantec.com/norton/support/productdetail/contact_ts.jsp?pvid=nav_2009

I love Norton products, but I'm not a fan of the auto-renew feature since it's not something I can turn off myself by logging into my account.

By the way, if you have noticed that your credit card was charged by the auto-renew feature, you can request a refund using the online chat support.

Updated 19 September 2009: It appears that Norton has once again changed how they handle the auto-renew feature.  You used to be able to turn off auto-renew in your Norton account, but this is no longer the case.  Now if you want to stop Symantec (or Norton) from automatically renewing your subscription, you need to fill out an online form and submit it. You can also get the feature disabled by chatting online with one of the support reps.

To disable Norton's Automatic Renewal Feature, click here.

To chat with a Norton rep, click here.

To read what Norton has to say about it's auto-renewal feature, click here.


Updated 13 April 2010:

Symantec has made it easy to enable and disable the Auto-Renewal feature now.  Below are detailed instructions.

  1. Log into your Norton Account.  If you don't know how to get to this web page, go to Google and type in "My norton account" and search.
  1.  Click the link that reads, "Automatic Renewal"

  1. By default, the box is checked.  Click in the box again to uncheck it.  If the box is checked, auto-renewal is enabled.  If it's uncheck, auto-renewal is disabled.   Click the Update button when finished.  

    1. Be sure to click the "Turn Off" link on the yellow window that pops up next.

    Tuesday, February 17, 2009

    Adding, Deleting & Renaming Excel Worksheets

    This morning I was asked how to insert new worksheets into an Excel spreadsheet and I wanted to post the answer here to share with everybody.

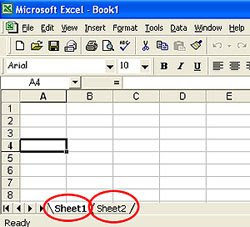
    When you create a new Excel document, it contains 2 or 3 worksheets by default (normally labeled, "sheet1", "sheet2", etc.). You'll see the worksheet tabs at the bottom of your new document. You can rename these worksheets, delete them, or add more depending on your needs.

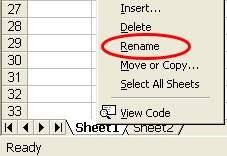
    To Rename a Worksheet, RIGHT click on the worksheet name and select RENAME. You'll notice that the name of the worksheet is now highlighted in black. You can delete the old name and type a new one or just type over the black highlight. Be sure to hit the "enter" key when done to save the new name.

    Notice that when you RIGHT clicked on the worksheet name, there were other choices besides rename. You could INSERT a new worksheet, DELETE a worksheet, MOVE or COPY a worksheet, and SELECT ALL worksheets.

    This is the easiest way to insert, delete and move/copy worksheets. Just follow the rest of the prompts after clicking the appropriate action.

    Besides RIGHT clicking on a worksheet and selecting INSERT, you can also insert a new worksheet by selecting INSERT > WORKSHEET on the document's menu.

    To delete, move or copy worksheets using the menu, select EDIT and then the appropriate action.

    By the way, you can also rearrange worksheets by holding the left mouse button down on a worksheet name and dragging it to where you want it (then let go of the mouse button).

    That's all there is to it.

    Sunday, February 15, 2009

    Comment Link is Finally Working

    Many of you have reported problems when posting comments on posts here. I've been trying to resolve this issue for a couple of months now. I'm happy to report, the problem is fixed (thanks to the help of another blogger). You can now post comments on this bog.

    By the way, if you have a blog or just want good old fashion news/info that's truthful (and doesn't have a liberal spin), check out the 'webfixer' site (this is the guy that helped me fix the problems with my comment link. But first I must warn you,that as soon as you enter his site, you will hear rockin' country music. While I personally loved this, I wanted to warn you so that you weren't startled by the audio on the site (which can happen when it's unexpected).

    Thanks 'webfixer'!

    Friday, February 13, 2009

    Lost Menu in Adobe Reader

    The menu in Adobe Reader is very helpful and so it can be frustrating when you accidentally lose it due to a fat-fingering of keystrokes, etc.

    Like most programs, hitting the F1 key will call up the Help Menu. From there, you'll have to dig around to discover that the way to get the menu back is to follow these steps: "F9/Shift+Command+M"

    For most of us, this set of commands is confusing. I'll admit, it confused me too. The problem with the above command, is that it's really TWO separate commands - one for computers running Windows (F9) and one for MAC computers (Shift+Command+M). I suppose Adobe just assumed everybody would intuitively understand this.

    Now you know. If you lose your menu in Adobe Reader, and are using a computer running Windows (WinXP, Vista, etc.), then hit the F9 key while the program is open. This should bring the menu back.

    If you're using a MAC computer, you'll have to hit the three key-combination (Shift+Command+M) to bring back the Menu in Adobe Reader.

    Thursday, February 5, 2009

    Tips for Fighting Internet Porn

    One of the down sides of this job is that I'm constantly exposed to porn. I know many of you are too. We all get pornographic spam in our email boxes. Since there are few agencies out there willing to help us combat the problem, most of just delete the junk emails without ever opening them.

    But sadly, the problem continues to worsen and it's to the point now where you can't even search for innocent information without coming across some inappropriate info and graphics. Even folks watching this year's Super Bowl were exposed to porn during the game!

    Folks are always asking me what they can do to stop it, and in the past, I've only had the standard answers (don't open the emails, avoid adult sites, etc.). But today, I did some more research and found a site that is actively trying to fight internet porn.

    The site is ObscenityCrimes.org and I encourage everybody to visit it. You'll find links to report email porn as well as websites you come across. There's also information to help folks who are struggling with porn addictions.

    There's another site that handles child porn. You can make anonymous reports on the National Center for Missing & Exploited Children's website.

    Obscene material containing adults should be reported to ObscenityCrimes.org and obscene material involving kids should be reported to the National Center for Missing & Exploited Children. Some of these kids may be 16 and 17 years of age, but they are still kids - and even possessing child porn is a criminal offense.

    Help protect children! Visit the web sites above!

    Monday, February 2, 2009

    Free Drawing & Paint Program for Kids

    Yesterday I was helping my six year old nephew set up a user account on his family's computer and he asked me if I could install a program call Tux Paint for him. No kidding - and he's only 6!

    Having never heard of the program before, I did what I always do and Googled the name. Turns out this program is an open source program (which means its free!) designed specifically for kids age 3 to 12 years.

    While all Windows-based computers come with Microsoft Paint installed, Tux Paint is unique in that it's more kid-friendly. My nephews have been using this program at school and love it. In addition to being able to create art, Tux Paint also has a rubber stamping feature which is very cool!

    Tux Paint can be installed on versions of Windows as well as MAC computers. The program is free and safe. Since it's a program many of the kids are already using in school, they might enjoy having it on their home computers too (my nephews certainly do).

    To download Tux Paint, click here.