Ever have somebody email you a Word or Excel document created in Microsoft Office 2007 and you can't open it? That's because Microsoft changed the naming convention on their documents (don't you love improvements?!).
The problem is that previous versions of Microsoft Office used the standard naming convention (Word documents ended in the file extension ".doc", Excel documents ended with the ".xls" file extension, etc. However, Microsoft Office 2007 added an "x" to the end of the file extensions. Thus, Word documents became ".docx" docs, and Excel became ".xlsx" documents, etc.
The good news is that Microsoft has fix for the incompatibly issues. You can download and install a free compatibility pack that will allow you to open Microsoft Office 2007 documents. To get the free Microsoft Office Compatibility Pack, click here.
If you're using an earlier version of Microsoft Office (2003, 2000, etc.), I recommend downloading and insdtalling the Microsoft Office Compatibility Pack whether you think you need it or not. This way, you'll be able to open Office 2007 documents should the need arise.

Tuesday, December 30, 2008
Dell Computer Keeps Booting to Diagnostic Screen
Today, I encountered a unique problem with a brand new Dell computer. One of my clients had bought a new computer from Dell and asked me to come by and set it all up for him. Oddly enough, as soon as we plugged everything in and booted up the computer, we encountered the diagnostic screen.
Although there was an option to exit the diagnostic screen, doing so, only brought you right back to it. Running the tests worked great, but again, you were back to the diagnostic screen (which you still couldn't exit out of) when finished.
I even tried rebooting the computer and pressing F8 to bypass the normal start up process, but that did nothing. After every trick I knew failed, my next instinct was to reload Windows XP using the System Restore disk and start over.
But before doing that, I called Dell support and decided to talk to them about it. Dell suggested I ship the computer back to them and they would reload everything (also suspecting a software problem at the time the computer was first set up). I suggested using the System Restore disk first and if it failed to correct the problem, I would then be willing to ship the computer back.
Starting the restore process, gave me the opportunity to look at the partitions that Dell had set up at the factory. As it turns out, they were wrong. Somebody had loaded the "C" partition with the Dell Diagnostic program, and loaded the operating system (WinXP) on the "D" partition.
Because of this arrangement, the computer had no choice but to keep booting the Diagnostic program (wasting my time and causing frustration).
To fix the problem, I had to delete both partitions, create a new single partition and reload the Operating System from disk. Then of course, once Windows was restored, I had to reinstall all of the drivers and software that came with the computer. But the problem was solved and I didn't have to ship the computer back to Dell!
Monday, December 29, 2008
Paper Mismatch Error
Have you seen the "paper mismatch" error when printing? I've seen it a few times now on different computers, running different operating systems, etc. The only common variables between the computers had in common were that the users were trying to print Works documents (Works Word, or Quattro, etc.) and they were using HP Officejet printers.
The first time I saw the error, one of my clients was trying to print a Quattro spreadsheet in landscape format when the error occurred. She could print Quattro documents in portrait, but not landscape.
The second time I saw the error, the person was trying to print a Works Word Processing document size 5.5 x 8.5. Again, everything was configured properly, but the "paper mismatch" error appeared.
It doesn't matter how many times you check your printer and document configuration settings, or change the paper type in your printer ... nothing fixes the error message.
The folks at HP have apparently seen the problem several times because they have troubleshooting steps on their support site for the "paper mismatch" error. However, none of the steps solve the problem.
The only fix I've been able to find, is to convert the document from a Works document to a Microsoft Office document. For example, if you were trying to print a Quattro spreadsheet, covert the document to Excel. If you were trying to print the document in Works Word, convert the document to Microsoft Word. Each time, this conversion has solved the paper mismatch problem (making me wonder if the problem is tied to Works, and not HP printers).
Of course, in order to make the conversion, you have to have Microsoft Office installed on your computer (which I always recommend). If you don't have Microsoft Office installed, you can either buy it or try converting the document in question to another type of document (like Word Pad).
If you do have Microsoft Office installed, the easiest the way to perform the conversion is to open the Works document in question, and then on the menu select FILE > SAVE AS then SAVE. Some formatting may be lost, but this process is a lot easier than retyping the info in Microsoft Word or Excel.
Once you make the conversion and verify you can print your document (without the paper mismatch error), I recommend deleting the original Works document to eliminate confusion.
Friday, December 26, 2008
New Version of Windows To Be Released in 2010
A few people have asked me recently about the "new version of Windows" which is supposed to replace Vista. Although little information is known at this time, it's true that there is new version of Windows (called, Windows 7) which is supposed to be available in 2010.
Why is Microsoft releasing another Operating System (OS) so soon? One reason, of course, is to make money by constantly offering new innovative products. But another reason is that folks are still refusing to embrace Vista as XP's replacement.
While average home consumers don't have a lot of influence over Microsoft. corporations do. And according to a recent article, only 10% of businesses have made the switch to Vista, while the remaining 90% have put pressure on Microsoft to continue supporting Windows XP.
Because of this pressure, Microsoft hasn't pulled XP completely off the shelf yet and you may still be able to get it on a new computer. It also means that Microsoft will continue supporting XP longer than expected (which is good news for most of us).
To track the progress of Widows 7, Microsoft has set up a web page that you can visit. This page will share information as it becomes available and you'll be able to see what some of the changes and differences will be.
You can visit the Windows 7 web page by clicking here.
Thursday, December 25, 2008
Is Your Computer Compatible with Vista?
A lot of folks have been asking about Vista lately, wondering if Vista has improved any since its release date. The answer is 'yes', at least in my opinion.
Whenever a new Operating System (OS) is released, I usually advise my clients to stay away from it for a good year or so. This is because software is typically released before all the bugs are worked out of it, and there are usually compatibility issues with other software and hardware that may be running on the computer.
But now that Windows Vista has been out a while, it's more stable and more drivers have been created to solve compatibility issues. I've been using Vista for about a year now, and have not had any major problems with it. In fact, Vista has a few features that I have even come to love (like their gadgets).
For most of my clients, I still advise that they DON'T upgrade their computers to Vista - because of compatibility issues. But, if buying a new computer, then don't worry about getting Vista on it. Eventually, we'll all be forced to switch to Windows Vista. And that being the case, it's best to wait til you buy a new computer. You'll have a lot less headaches this way.
None the less, if you are considering making the switch to Windows Vista, you might want to check their compatibility list first to see if your existing hardware and software will work Vista. You can check compatibility list by checking the link below.
http://www.microsoft.com/windows/compatibility/
Checking the list can save you hours of frustration down the road when upgrading to Windows Vista.
Wednesday, December 17, 2008
Customizing Your Google Home Page
Once you have your Google home page set up, the next step is to customize it for you. By doing so, you can ensure that you're getting the information you want, while removing the stuff you don't want.
Once you've logged into your Google home page, you'll see a couple of links labeled, "Themes for Causes" and "Add Stuff".
The "Add Stuff" link will help you add RSS feeds and gadgets (like weather and calendar) that you're interested in. There are loads of gadgets and to make them easier to find, Google has separated them into categories (like tools, sports, finance, etc.).
In addition to the weather and calendar gadget, I tend to favor the "bookmarks" gadget and my favorite RSS feeds.
When you find one you like, simply click the "Add it Now" button under it. When done, click the "back to iGoogle home" link at top of page. If you hold the left mouse button down on the title bar of the gadget, you can drag and drop it anywhere you like on the page.
The "Themes for Causes" link allows you customize your Google page for a holiday, sports, or other theme. Some folks like to do this, some don't. It's a personal preference thing. But check it out to get a feel for how it works.
Having a Google home page can make your internet experience easier and more enjoyable. So give it a try.
Monday, December 15, 2008
Are You Protected from the Facebook Virus?
Computer viruses are typically designed to target popular programs ... and as such, there is now one targeting Facebook users. This virus was first discovered in August 2008 and is known by its technical name, "W32.Koobface.A" (and W32.Koob.face.worm, and Boface.A).
The best way to protect yourself against this worm is to make sure your antivirus software is up to date.
If you don't have an Antivirus program on your computer, I highly recommend Norton Internet Security (not Norton 360).
For more information about other viruses found on facebook, click here.
The best way to protect yourself against this worm is to make sure your antivirus software is up to date.
If you don't have an Antivirus program on your computer, I highly recommend Norton Internet Security (not Norton 360).
For more information about other viruses found on facebook, click here.
Beware of Perfect Defender!
Perfect Defender is another rogue, malware program (like Windows Antivirus). You'll know it has found its way onto your computer when you start seeing popup windows warning you of infections and asking you if you want to block programs from accessing your computer.
This is the time to stop what you're doing and remove the program from your computer.
You won't find Perfect Defender anywhere in your control panel under "Add/Remove Programs" (WinXP and earlier) or "Program and Features (Vista). You'll need a special program designed to remove Perfect Defender (or a some computer-know-how to remove it manually).
My advice is to get purchase a program called, Anti-Malware (by MalwareBytes). I've used this program several times to remove Windows Antivirus, Perfect Defender, and other rogue malware programs, and it works better than most other programs (and is easier to use!).
Programs like Perfect Defender and Windows Antivirus are capable of finding their way past many antivirus software programs. Installing Anti-Malwarre on your computer will help protect from these kinds of threats. Best of all, buying the program is a one-time fee!
For more information about Perfect Defender and Windows Antivirus, click here.
How to Setup a Google Home Page
Google allows you to create custom home pages which can make your internet life a lot easier. The big advantage of doing this is that you can view the information you want to see and remove the rest. These pages also tend to load a lot faster than MSN or Yahoo because there is a lot less graphics and advertising slowing things down.
Getting started is really easy. Just go to Google and create a new account (it's free).
https://www.google.com/accounts/NewAccount
If you already have a Google account, just sign in.
https://www.google.com/accounts/Login
Once you sign into your Google account, click the GOOGLE HOME link (top right corner of page) then the iGOOGLE link. This is the page you want to set as your home page.
To make Google your home page (so that it opens every time you open your internet browser), follow these steps ...
To learn how to customize your Google home page, click here.
Getting started is really easy. Just go to Google and create a new account (it's free).
https://www.google.com/accounts/NewAccount
If you already have a Google account, just sign in.
https://www.google.com/accounts/Login
Once you sign into your Google account, click the GOOGLE HOME link (top right corner of page) then the iGOOGLE link. This is the page you want to set as your home page.
To make Google your home page (so that it opens every time you open your internet browser), follow these steps ...
- On the menu, click TOOLS and INTERNET OPTIONS (IE) or OPTIONS (Firefox)
- If using Internet Explorer, click the USE CURRENT button then OK
- If using Firefox, click the USE CURRENT PAGES button then OK
To learn how to customize your Google home page, click here.
Sunday, December 14, 2008
How to Change Your Internet Home Page
When you first open Internet Explorer (or your internet browser of choice), the first page you see is referred to as your "home page". For may people, the home page is MSN or Yahoo. But this page can be set to any web page you want.
One of the frustrations folks encounter is that sometimes this page gets changed without your knowledge or permission. But in most cases, following the steps below will fix the problem.
The easiest way to change your home page is to go the web page you'd like to make "home" first. Then follow the steps below to make it your home page.
For Internet Explorer .......
For Firefox .....
If you're using Internet Explorer 7 or Firefox, you can set multiple pages to open in tabs automatically when you first open the browser. To do this, open a tab and browse to the page you'd like to have open automatically (repeat this step for every page you want to automatically open). Once you have all the pages opened in tabs, follow the steps above to set your home page.
If you like, you can take setting a custom home page a step further. Several sites (like Google, MSN, and Yahoo) allow to customize their pages and make them your own. The advantage of doing this is that you can customize the pages so that you're getting the news or other information you want while removing the stuff you don't want.
While I have used MSN and Yahoo in the past, I have since switched my homepage to Google because it loads a lot faster and is much easier to customize and add RSS feeds to than the others.
So take control of your browser and set your own customized home pages.
To learn how to set up a Google home page, click here.
For more information tips on configuring your Firefox home page, click here.
One of the frustrations folks encounter is that sometimes this page gets changed without your knowledge or permission. But in most cases, following the steps below will fix the problem.
The easiest way to change your home page is to go the web page you'd like to make "home" first. Then follow the steps below to make it your home page.
For Internet Explorer .......
- On the menu, select TOOLS then INTERNET OPTIONS (a new window pops up)
- Click the USE CURRENT button and then OK
For Firefox .....
- On the menu, select TOOLS then OPTIONS (a new window pops up)
- Click the USE CURRENT PAGES button and then OK
If you're using Internet Explorer 7 or Firefox, you can set multiple pages to open in tabs automatically when you first open the browser. To do this, open a tab and browse to the page you'd like to have open automatically (repeat this step for every page you want to automatically open). Once you have all the pages opened in tabs, follow the steps above to set your home page.
If you like, you can take setting a custom home page a step further. Several sites (like Google, MSN, and Yahoo) allow to customize their pages and make them your own. The advantage of doing this is that you can customize the pages so that you're getting the news or other information you want while removing the stuff you don't want.
While I have used MSN and Yahoo in the past, I have since switched my homepage to Google because it loads a lot faster and is much easier to customize and add RSS feeds to than the others.
So take control of your browser and set your own customized home pages.
To learn how to set up a Google home page, click here.
For more information tips on configuring your Firefox home page, click here.
Saturday, December 13, 2008
How to Disable the HP Splash Screen
When you first turn on your HP computer, you see the HP logo on the screen. This screen is also commonly known as the "splash screen" (i.e., the screen you see when the computer is booting up).
Most people don't care to look at the scrolling text underneath that screen. But when you're trying to gain information about the computer or diagnose a problem, you need to see that text.
Many computer manufacturers allow you to bypass their logo screen by hitting the TAB key on the keyboard. But not HP. They insist you put a bit more effort into disabling that screen. Below are the steps for how to do this:
Step 1:
As soon as you turn the computer on, hit the F1 key to enter the system BIOS
Step 2:
On the menu, select the BOOT option by moving the right arrow on the keyboard.
Step 3:
Making sure BOOT-TIME DIAGNOSTIC is highlighted, hit the ENTER key on the keyboard
Step 4:
Select ENABLE to disable to HP Splash screen
How to Open Emails with PowerPoint Attachments
One of the common email problems folks have is opening PowerPoint (or .pps and .ppt) attachments. There's a lot of cool stuff in PowerPoint format which is often forwarded to others via email, but if you don't have PowerPoint on your computer, you can't open the attachments.
Luckily, Microsoft provides an easy fix for this problem. You can download and install a free PowerPoint Viewer from the Microsoft website. This viewer will allow to view and print PowerPoint presentations, but not create or edit them. For most folks, this is fine.
You can get the PowerPoint viewer by clicking here, or by searching "PowerPoint viewer" in Google.
It's also worth noting that Microsoft also provides free viewers for Word and Excel which you can download and install. Again, these viewers allow you to open, view and print Word and Excel documents (but not create or edit them).
You can get the Word Viewer by clicking here.
You can get the Excel Viewer by clicking here.
Keep in mind that if you already have Microsoft Word, Excel or PowerPoint installed on your computer, then you don't need to download and install the viewers.
Some new computers come with the PowerPoint viewer already installed, so it's a good idea to check your programs list before downloading and installing it.
Friday, December 12, 2008
How to Insert Pictures into Word
Tis the season that everybody is writing their Christmas letters to friends and family. While I'm sure everybody appreciates the "year in review" letters, how about adding some pictures to spice them up a bit. As they say, pictures are worth a 1,000 words ...
Below are the steps on how to add pictures to Microsoft Word documents. The steps are similar for adding images to other documents as well (like Works and Word Perfect), although the options to format the picture may be different.
The first step is to open the document that you wish to insert the picture into.
Then on the menu, select INSERT, then PICTURE, then FROM FILE (note you could add a pictures from clipart too). Browse to find the picture you want to insert and ready, click it and click the INSERT button.
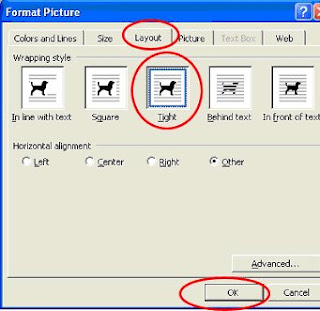
The next step is to position the picture where you’d like it to appear. To do this, double left click the picture to open the Format Picture window.
On the new window, click the LAYOUT tab and then click the TIGHT box. Click the OK button to close window.
Now you can drag the image wherever you like, by holding the left mouse button down and dragging the image. Release the buttons to leave the image where it is.
Notice that text will wrap around the image with the “tight” setting. You have other options in the Format Picture window if you don’t want this. You may also have to hit the carriage return (or Enter key) to move the text so it looks right on the page.
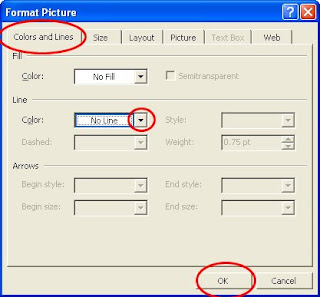
Feel free to experiment with the options in the Format Picture window. If you click the COLORS and LINES tab, you can add a border around the image (to frame it) if you like. In my experience, this option is not available until you follow the steps on the Layout tab first.
Below are the steps on how to add pictures to Microsoft Word documents. The steps are similar for adding images to other documents as well (like Works and Word Perfect), although the options to format the picture may be different.
The first step is to open the document that you wish to insert the picture into.
Then on the menu, select INSERT, then PICTURE, then FROM FILE (note you could add a pictures from clipart too). Browse to find the picture you want to insert and ready, click it and click the INSERT button.
The next step is to position the picture where you’d like it to appear. To do this, double left click the picture to open the Format Picture window.
On the new window, click the LAYOUT tab and then click the TIGHT box. Click the OK button to close window.

Now you can drag the image wherever you like, by holding the left mouse button down and dragging the image. Release the buttons to leave the image where it is.
Notice that text will wrap around the image with the “tight” setting. You have other options in the Format Picture window if you don’t want this. You may also have to hit the carriage return (or Enter key) to move the text so it looks right on the page.
Feel free to experiment with the options in the Format Picture window. If you click the COLORS and LINES tab, you can add a border around the image (to frame it) if you like. In my experience, this option is not available until you follow the steps on the Layout tab first.

Thursday, December 11, 2008
Create Labels & Other Things
You've probably been buying Avery products for years, but did you know that Avery has free software and templates you can use too?
Avery creates free templates you can download and use to create labels. They also have an online section where you can create your own labels on the internet and then print them on your computer.
Many of these templates are created in Microsoft Word so they are easily editable. But if you don't have Word, you can download and installed their free program called, Avery Design Pro.
Did I mention these these things are free?
Check out the link below for more information about Avery's products and options.
http://www.avery.com/avery/en_us/Templates-%26-Software
To learn how to print Avery labels online, click here.
Wednesday, December 10, 2008
Christmas with a Capital "C"
Normally I'd only share computer related information on this blog, but I just had to share this cool video and song that I came across yesterday. Enjoy!
Uninstalling Programs in Vista
One of the differences between Windows Vista and Windows XP is the name of some of the icons in the Control Panel. In Windows XP, there was an icon called, "Add or Remove Programs". While that icon still exists in Vista, the name has been changed to "Programs and Features".
So now when you want to uninstall a program in Windows Vista, you'll have to click on the "Programs and Features" icon in the control panel first. The window that comes up looks basically the same as the old one in XP. And the process for uninstalling a program is pretty much the same.
Scroll down the list until you find the program you want to uninstall and then highlight it (single click). Then click the UNINSTALL button near the top of the window and follow the rest of the prompts (if any).
That's all there is to it.
Monday, December 8, 2008
How to Find Images & Clipart
Do you like to make your own greeting cards and other crafty projects? While programs like Print Master, Publisher, and others contain clipart, often times those images aren't "just right" for the project you're working on. Wouldn't it be nice if you could always find that "perfect" image for the project you're working on?
Well thanks to the internet, you may be able to. Google not only indexes web pages, but it also indexes images. And if the webmaster is doing their job when creating web pages, they're giving those images relevant names to help Google index the images ... and this helps you too!
Finding images in Google is really easy. Just type in keyword (like "Christmas images") and click the search button. When the results are returned, click the "images" link at the top of the page.

Now you're looking at only images (and not web pages). When you see an image you like, click it. When you do, the next window will be split in two halves. The top half contains a thumb nail of the image along with information about it. The bottom half contains the web page that the image is originally found on.
Most of the time, you'll only care about the top half of the window. This is the actual image, and after all, that's what we're looking for.
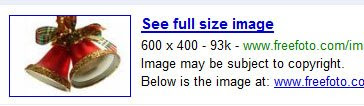 The image above is an example of the top half of the window. Notice the four lines of text. The second line of text tells you how big the image is. Looking at this info will tell you if the image will be large enough for your project. In this case, the image is 600x400 pixels - which is a good size. You can always reduce the size of the image if it's too large - but you can't enlarge it (or it will look blurry).
Most of the images you find on the internet are copyrighted. So you'll always see the third line of text on the image above. However, as long as you're using the images for your personal projects and not using them in commercial projects, I wouldn't worry too much about copyright.
The last line of text above tells you the web page that contains the original image. This information may or may not be useful to you, depending on your needs.
Keep in mind that the image shown next to the text is a thumbnail (i.e., a smaller version of the original). To see the full size image, click the thumbnail.
If you like the image, you can save it to your computer by RIGHT clicking on it, and selecting SAVE IMAGE AS. Note that there are times, when a web page may prevent you from RIGHT clicking on images - if that's the case, you can use the screen capture button on the keyboard to save the image.
Use the "back button" your browser to go back and search more images.
Keep in mind that when searching images, you may want to try a couple of different terms including, "images", "clipart", "graphics", and "photos".
You can be as specific (Christmas bells) or general (Christmas) as you like when searching. Sometimes you have to try searching a few different terms to narrow down your search.
Give it a try and have fun!
Well thanks to the internet, you may be able to. Google not only indexes web pages, but it also indexes images. And if the webmaster is doing their job when creating web pages, they're giving those images relevant names to help Google index the images ... and this helps you too!
Finding images in Google is really easy. Just type in keyword (like "Christmas images") and click the search button. When the results are returned, click the "images" link at the top of the page.

Now you're looking at only images (and not web pages). When you see an image you like, click it. When you do, the next window will be split in two halves. The top half contains a thumb nail of the image along with information about it. The bottom half contains the web page that the image is originally found on.
Most of the time, you'll only care about the top half of the window. This is the actual image, and after all, that's what we're looking for.
 The image above is an example of the top half of the window. Notice the four lines of text. The second line of text tells you how big the image is. Looking at this info will tell you if the image will be large enough for your project. In this case, the image is 600x400 pixels - which is a good size. You can always reduce the size of the image if it's too large - but you can't enlarge it (or it will look blurry).
 Most of the images you find on the internet are copyrighted. So you'll always see the third line of text on the image above. However, as long as you're using the images for your personal projects and not using them in commercial projects, I wouldn't worry too much about copyright.
The last line of text above tells you the web page that contains the original image. This information may or may not be useful to you, depending on your needs.
Keep in mind that the image shown next to the text is a thumbnail (i.e., a smaller version of the original). To see the full size image, click the thumbnail.
If you like the image, you can save it to your computer by RIGHT clicking on it, and selecting SAVE IMAGE AS. Note that there are times, when a web page may prevent you from RIGHT clicking on images - if that's the case, you can use the screen capture button on the keyboard to save the image.
Use the "back button" your browser to go back and search more images.
Keep in mind that when searching images, you may want to try a couple of different terms including, "images", "clipart", "graphics", and "photos".
You can be as specific (Christmas bells) or general (Christmas) as you like when searching. Sometimes you have to try searching a few different terms to narrow down your search.
Give it a try and have fun!
Monday, December 1, 2008
How to Take Capture Your Screen
One of the questions I get asked a lot is how to capture what you see on the monitor. The answer is simple and I wanted to share it here for everybody.
If you look at the keyboard, you'll see a key that reads, "Print Screen". This key is usually in the top row to the right of the numbers. All you need to do is press this key in order to capture the screen. The image is placed on the invisible clipboard and the next step is to paste it somewhere.
There are a couple of options for pasting the screen shot. You could open Microsoft Word or Works and paste the image in a blank document (EDIT > PASTE on the menu).
Another option would be to paste the image in a graphics program (like Paint, Paint Shop Pro, Adobe Photoshop, etc.). Pasting the image in a graphics editor allows you to easily crop and edit the image.
How to Capture the Active Window Only
If you don't want to capture the entire screen, you could use the ALT key in combination with the Print Screen key to capture the active window. This is nice when you want to capture an error message to send to somebody. To do this, simply, click the window you want to make active then hold down the ALT and PRINT SCREEN together.
After capturing the window, you can paste it into a blank document or graphics editor program.
Monday, November 24, 2008
How to Defrag Your Computer
Defrag is another computer maintenance task that should be performed regularly. At the very least, it should be ran quarterly. The process is simple and normally takes about an hour to run.
But before sharing the steps on how to run Defrag, I wanted to answer some of the common questions surrounding it. First ...
Why Defrag?
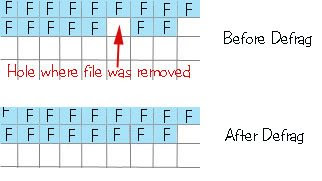
Think of your hard drive as a checkerboard. Every time you create a file (F), it takes a place on the checker board. When you delete a file, it leaves and empty space on the checker board where the file was. The next time you create a file, it doesn't go back and fill the empty space ... instead, it continues filling the spaces after the last one was created. So in time, you have "holes" or empty spaces left on the checker board in between files.
These empty spaces mean that your hard drive has to work harder to access your files and it slows down the computer. When you run Defrag, it picks up all the files and puts them in contiguous order again so all the empty spaces are filled ... which in turn allows the computer to access your data more quickly.
How to Run Defrag
The steps are simple. But first, note that it can take an hour or so to run it, and it's best to run it when you're not working on your computer. I like to run Defrag when I leave the house or am watching TV so as to ensure I leave the computer alone while it's running.
To run Defrag, follow these steps:
By the way, if your computer is running Windows Vista, you don't have to run defrag (unless you want to). One of the nice features of Windows Vista is that Defrag automatically runs in the background while you're working on the computer.
Click here to learn how to run Disk Cleanup.
But before sharing the steps on how to run Defrag, I wanted to answer some of the common questions surrounding it. First ...
Why Defrag?
Think of your hard drive as a checkerboard. Every time you create a file (F), it takes a place on the checker board. When you delete a file, it leaves and empty space on the checker board where the file was. The next time you create a file, it doesn't go back and fill the empty space ... instead, it continues filling the spaces after the last one was created. So in time, you have "holes" or empty spaces left on the checker board in between files.
These empty spaces mean that your hard drive has to work harder to access your files and it slows down the computer. When you run Defrag, it picks up all the files and puts them in contiguous order again so all the empty spaces are filled ... which in turn allows the computer to access your data more quickly.

How to Run Defrag
The steps are simple. But first, note that it can take an hour or so to run it, and it's best to run it when you're not working on your computer. I like to run Defrag when I leave the house or am watching TV so as to ensure I leave the computer alone while it's running.
To run Defrag, follow these steps:
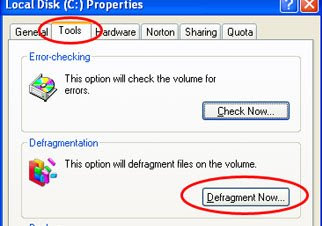
- Click the START button and then MY COMPUTER
- RIGHT click on the Local Disk "C" Drive and select PROPERTIES
- Click the TOOLS tab
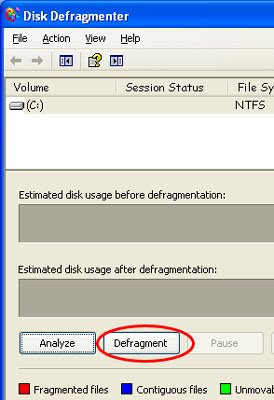
- Click the DEFRAGMENT button
- Click the DEFRAGMENT again on the next window and then wait til the process completes (about an hour).


By the way, if your computer is running Windows Vista, you don't have to run defrag (unless you want to). One of the nice features of Windows Vista is that Defrag automatically runs in the background while you're working on the computer.
Click here to learn how to run Disk Cleanup.
How to Run Disk Cleanup
Over time, your hard disk gets cluttered up with unnecessary files, which then take up disk space. Removing these files should be part of your regular computer maintenance. The process is simple and is the same for WinXP and Vista.
Place a check mark next to the files you wish to remove. For the most part, you want to make sure the following boxes are checked:
When all the boxes are checked, click the OK button to remove the files.

I recommend running Disk Cleanup at least quarterly. It's also a good idea to run it before you Defrag your hard drive so that process is more efficient.
- Click the START button
- Open MY COMPUTER
- RIGHT Click on the Local Disk"C" drive and select PROPERTIES (a new window comes up)
- Click the DISK CLEANUP button.
- If asked if you want to remove the files for all users or just your own, click the option to remove all files.
Place a check mark next to the files you wish to remove. For the most part, you want to make sure the following boxes are checked:
- Temporary Internet Files
- Recycle Bin
- Temporary Files
- Web/Client Publisher Files
When all the boxes are checked, click the OK button to remove the files.

I recommend running Disk Cleanup at least quarterly. It's also a good idea to run it before you Defrag your hard drive so that process is more efficient.
Sunday, November 23, 2008
Windows Defender Explained
Windows Defender is a new program that comes with Windows Vista. This program is Microsoft's answer to helping you stop spyware, adware, and pop-up windows from web sites. By fixing these problems, Microsoft hopes to fix some of the problems that cause computers to slow down.
There is a Windows Defender icon in the control panel (it looks like a little brick wall). Once the Windows Defender is up, you can run a scan or configure different options.
By default, the program is configured to update and run automatically, but you change how the program does this. To make changes, click the TOOLS link at the top of the window and then the OPTIONS link.
Windows Defender is designed to do the same job that other programs like Webroot, Spy Doctor, and Adaware are doing. So you may not need to purchase one of those other programs unless you are having problems that Windows Defender is not fixing or removing.
If you use Windows XP, you can download and isntall Windows Defender for free. Microsoft even allows free updates for XP users. To get Windows Defender, click here. Keep in mind that if you're already using another spyware removal program, that you don't necessarily need to install Windows Defender. However, once the subscription is up on the other program, you might consider switching to Windows Defender - since it's free!
To learn more about Windows Defender, visit the Windows Defender home page.
Failed Windows Updates
Folks running Windows Vista will sometimes notice that some of the Windows Updates failed when reviewing the update history.
First, if you've never looked at your update history, you can do so now by following these steps:
If you see a failed update in the list, note the update number (e.g., KB954366). After noting the number, check the updates above the failed one. If you see the same update installed successfully above the failed one, then you don't need to worry. Some updates need to be installed before others, so it may fail during one set, but install successfully later. That's okay.
If you see repeated failures on a specific update, then you may need to investigate further. You can search the update number in Google to see what comes up. Often times, the first link that comes up will take you the Microsoft page that tells you more about that update.
For example, on my computer the update history shows repeated failures for update KB954366.
When I search "KB954366" in Google, the second site in the list of results is to the Microsoft page explaining that update. Reading the page, I can see that this updates pertains to computers running the 64-bit edition of Vista. My computer is running 32-bit version, so it can't install that update (it's not compatible with my computer). So I can ignore KB954366 and references to its failure to install.
How do I know my computer is running is running the 32-bit version of Vista? I followed these steps to check:
First, if you've never looked at your update history, you can do so now by following these steps:
- Click the START button and then open the CONTROL PANEL
- Open the WINDOWS UPDATE icon
- On the left pane, click the link that reads, "view update history"
If you see a failed update in the list, note the update number (e.g., KB954366). After noting the number, check the updates above the failed one. If you see the same update installed successfully above the failed one, then you don't need to worry. Some updates need to be installed before others, so it may fail during one set, but install successfully later. That's okay.
If you see repeated failures on a specific update, then you may need to investigate further. You can search the update number in Google to see what comes up. Often times, the first link that comes up will take you the Microsoft page that tells you more about that update.
For example, on my computer the update history shows repeated failures for update KB954366.
When I search "KB954366" in Google, the second site in the list of results is to the Microsoft page explaining that update. Reading the page, I can see that this updates pertains to computers running the 64-bit edition of Vista. My computer is running 32-bit version, so it can't install that update (it's not compatible with my computer). So I can ignore KB954366 and references to its failure to install.
How do I know my computer is running is running the 32-bit version of Vista? I followed these steps to check:
- Click the START button
- RIGHT CLICK on Computer and select PROPERTIES
- Under the SYSTEM heading, you can check the SYSTEM TYPE (it will say 32-bit or 64-bit)
Running Windows Update in Vista
Running Windows Updates is an important part of regular computer maintenance. These free updates are software patches designed to fix problems and vulnerabilities in Windows. By making sure your computer is up to date, you're helping to protect your computer from viruses, hackers, and other malicious programs.
Microsoft has different categories of updates, but "critical" updates are the most important ones and should always be installed. You can configure your computer to download and install these updates automatically.
Microsoft also releases "recommended" updates. Some are worth installing, some aren't. In WinXP and earlier versions, recommended updates were not installed automatically. You had to review each update and make the choice to install. However, in Vista, you can configure Windows Update to automatically install recommended updates.
Running Windows Updates works a little differently differently in Vista than it did in WinXP and earlier versions. In Vista, there is an icon in the control panel now called, "Windows Updates". This is the tool used for running windows updates in Vista (as opposed to using Internet Explorer to go to the Windows Updates web site).
To turn on automatic updates in Vista, follow these steps:
To run Windows Updates manually in Vista, follow these steps:
Even if you have automatic updates turned on, it's a good idea to run Windows Updates manually once in a while to make sure all updates are installed.
Microsoft has different categories of updates, but "critical" updates are the most important ones and should always be installed. You can configure your computer to download and install these updates automatically.
Microsoft also releases "recommended" updates. Some are worth installing, some aren't. In WinXP and earlier versions, recommended updates were not installed automatically. You had to review each update and make the choice to install. However, in Vista, you can configure Windows Update to automatically install recommended updates.
Running Windows Updates works a little differently differently in Vista than it did in WinXP and earlier versions. In Vista, there is an icon in the control panel now called, "Windows Updates". This is the tool used for running windows updates in Vista (as opposed to using Internet Explorer to go to the Windows Updates web site).
To turn on automatic updates in Vista, follow these steps:
- Click the START button and open the CONTROL PANEL
- Open the WINDOWS UPDATE icon (a new window opens)
- On the left pane, click the link that reads, CHANGE SETTINGS
- Make sure the option to "install updates automatically" is checked
- You can change the default time of 3 am if you like (updates will not be downloaded if the computer is off)
- Make sure the last two options (recommended updates and use Windows Update service) are checked.
- Click OK when finished.
To run Windows Updates manually in Vista, follow these steps:
- Click the START button and open the CONTROL PANEL
- Click the INSTALL UPDATES button in the main window (on right side)
Even if you have automatic updates turned on, it's a good idea to run Windows Updates manually once in a while to make sure all updates are installed.
Friday, November 21, 2008
Norton System Works Really Works
One of my favorite programs is Norton System Works. I've been using for years on my own computer as well as my client's computers.
In addition to fixing problems found in Windows, it also has some other useful utilities. One of these utilities is called, Speed Disk - which is similar to Defrag, only it works a little more efficiently. Disk Cleanup is another nice utility. There are more utilities that come with the Norton System works that make it worth it's money.
The only complaint some people have about the software is that it slows down their computers some because it runs in the background. I've never noticed these problems on my computer. But the nice thing is that even if you install it, you can disable the program from running in the background - and only use it when you want to. This will solve the problem of it slowing down the computer.
I've been using Norton System Works for years and highly recommend it to others.
FinallyFast.com Explained
You may have seen the commercial on TV about a website called FinallyFast.com. The commercial shows people unhappy and frustrated about how slow their computers are running, and how a website magically fixed their computer problems.
The question on many people's minds is, whether or not the site is legit or if it's a scam. Before answering this question, it's important to understand what the site is claiming it can do.
It's true that problems creep into computers over time as you use them. Some of the problems are caused by us, some aren't. Left unchecked, these problems can add up and cause your computer to slow down or crash.
You can buy programs that have been designed to look for these problems and fix them. One of these programs is called, WinDr (made by Norton). I've been using WinDr (part of Norton System Works) for years and love it. WinDr only takes a few minutes to run and is designed to look for problems in Windows and fix them. By running this program regularly, I can find and fix small problems before they become bigger ones.
There are other programs out there that are similar to WinDr which pretty much do the same thing.
What makes FinallyFast.com different is that it works over the internet so you don't have to buy and install a separate software program. But it's doing the same thing as WinDr and similar programs ... and you still have to pay for the service. FinallyFast.com charges an annual fee to fix the problems (although you can scan your computer for free).
So is FinallyFast.com worth your money?
When you buy a computer nobody ever tells you they need to be maintained, but they do. I think it's important to have a program like WinDr or FinallyFast.com to find and fix small problems in Windows before they cause bigger problems. I've been running WinDr on my client's computers for years as part of an extra service.
So, if you don't own WinDr and don't want to buy it, consider trying FinallyFast.com. You can try it for a year and see if it's worth another year.
Thursday, November 20, 2008
AntiVirus Software vs. Internet Security Software
In the old days when you bought Antivirus software, that's pretty much all you got - a software program that help protected you from known computer viruses.
But with the advent of adware, spyware, and phishing scams, you now need a program that can handle these threats as well as protect you from computer viruses. This where "internet security" software comes in.
Unlike Antivirus software, internet security software is designed to help protect you from all threats (including computer viruses). Most of the top Antivirus companies offer you the choice of buying Antivirus or Internet Security software ... and given the choice, you're better off buying internet security software.
While Norton Internet Security is still my preferred choice, there are others available for those aren't fond of Norton. Below are links to some of the other alternatives that folks are using.
Tuesday, November 18, 2008
The Best AntiVirus Program
One of the benefits of my job is that I get first hand experience with all the different antivirus programs out there. That's because my clients use different programs and so I get to see how well they perform when the latest threat is making the rounds on the internet.
And I still personally think Norton Internet Security is the best program on the market today. Sadly, folks either love Norton or hate it - there isn't much middle of the road on this subject.
Norton's biggest competitors are McAfee, Trend Micro, Panda, Kaspersky, and AVG, AVast, and Zone Alarm, to name just a few.
I don't like these other programs because they tend to be a lot more buggy than Norton (let's face it, Norton probably has the highest number of folks on staff next to Microsoft). This means they have a lot more money and personnel than most of the competitors to work on problems and perfect their software.
I've seen many viruses slip through the cracks with many of Norton's competitors, and in all the years I've been Norton, I haven't seen one virus slip through (knock on wood).
Ask folks what they hate about Norton, and you'll hear two primary complaints .... "they slow down my computer" and "they're tech support stinks".
A few years ago, the tech support argument was valid. But since Norton started using the online chat support, this argument has been eliminated. I've used this chat support system a lot and love it. You may still be talking to folks in India, but at least you can understand them when chatting online.
And as for slowing down the computer, it's true that Norton can slow things down a little. But much of that depends on which Norton product you're using and how old your computer is. If you have an older computer that has 512 MB of RAM or less, you will notice some slow down. But if your computer is newer and you have at least 1 GB of RAM, chances are you won't notice much slowing if any.
Norton has several different products, and the big one they are pushing these days is called Norton 360 ... but I'm not crazy about this product. It doesn't appear to be as stable as Norton Internet Security, and I don't think it's as user friendly. Another thing that annoys me about Norton 360 is that although you can disable the automatic backup feature, you are still plagued by messages telling you to set it up (which defeats the purpose of disabling it).
By the way, it is worth noting that there is a difference between "antivirus" software and "internet security software". Given the choice today, the preferred software is an "internet security" program.
When asked by clients what product I recommend, I still say, Norton Internet Security (not Norton 360).
Monday, November 17, 2008
How to Subscribe to this Blog
This blog uses RSS feeds to help keep you informed of the latest posts. If you're not familiar with RSS, it stands for "Really Simple Syndication", and it was invented by Netscape. In short, it's the web technology that allows sites to tell others new information has been added to it.
The big benefit of this technology, is that you get notified when new information is posted to the site (so you don't have to remember to check back on your own).
When you open Internet Explorer, you often see MSN, Yahoo, or some other web page that has several news links on it. Those links are put there by RSS technology. They change daily and are intended to help you stay informed of latest news developments.
In the past, you were limited to seeing the links that others wanted to feed you. But now, thanks to advancements in RSS technology, you can "choose" what links (or information) you'd like to see. There's only two requirements - first the site must have an RSS feed for you to subscribe to, and second, you must have an "RSS reader" (also called an aggregator) in order to read the information published by RSS feeds. This blog has an RSS feed, thereby satisfying the first requirement.
Look in the address bar and find the little orange icon with white lines on it (circled below).

This icon lets you know that a site uses RSS technology. The next step is to find the "subscribe" links somewhere on the page. To do this, you first need to choose an RSS reader (like Google, Yahoo, AOL, Bloglines, etc.).
On this blog, you'll see various feed links on the right sidebar. If you already have a google or yahoo homepage, you can just click the appropriate feed icon on the right sidebar to subscribe to the blog. The advantage of doing this is that each time you open Internet Explorer (or other browser), you can see links to the latest posts on this blog.
There are many other readers out there besides the ones listed here. Google and Yahoo are two of the easiest ones to work with and their homepages can easily be customized.
I personally use Google for my home page. You can sign up for free and the page is very easy to customize to meet your needs. And best all, with RSS technology, it's easy to stay informed of the news and information you're interested in - not what somebody wants to feed you!
If you'd like to learn more about RSS, click here.
How to Search This Blog
I post information on various computer related topics on this blog. The main page only shows the most current posts. Older information gets archived into folder named by month and year. This means that posts I write in November 2008, will be found put in the November 2008 folder. Over time, this can make it difficult to find the information you're looking for.
To make it easier for you to find specific information, I've included the blue search toolbar at the top of the page.
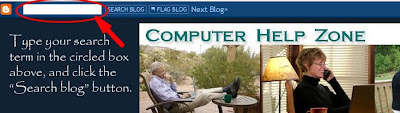
You can type in a search term, and click the "search blog" button next to it. The entire site will be searched for posts related to your searches.
For example, let's say you're looking for information on an internet scam. In the search block, you could type, "internet scams" or the name of the specific scam you're interested in, and then click the search blog button. If any posts related to your search are found on the site, they will be displayed in a list. Then you can click on the links to see the full post.
Keep in mind that you might have to try a few different search terms to find the information you're looking for (just as you do in Google).
Using the search blog toolbar will make it much easier to find specific information you're looking for, so don't hesitate to use it.
Sunday, November 16, 2008
Sharing Photos Online
As many of you know, I'm a bit of a photo nut. I love photography and especially enjoy taking photos of my nephews. My sister jokes that I'm her private paparazzi. But she neglects to mention is that thanks to my photo efforts, distant relatives and friends are able to see the boys doing various activities throughout the year.
One of the downsides to emailing photos is file size. With today's digital cameras, photos often range from 1-3 mb in size. With file sizes like these, you don't want to email more than 4 or 5 photos per email. So if you have more photos than this to share, you'll want to send multiple emails to make it easier for the receiver to download them.
Another downside is when you email photos one day, and then decide to email more to somebody else the next. Needless to say, this can be time consuming and a bit of a hassle creating the messages and attaching the photos every time you decide to email photos.
Photo sharing sites are an excellent alternative to emailing photos. Common photo sharing sites include Kodak Gallery , Webshots, Snap Fish, SmugMug, etc. There are too many sites to name.
While some of my friends use Snap Fish and others, I've been using Webshots the last couple of years. Webshots has both free and paid subscriptions and is very easy to use. The free account limits you to a 1,000 photos whereas the paid subscription lets you upload unlimited photos and until recently, was free of advertising. However, webshots recently changed hands and since then, even the paid accounts hit you with advertising - which is one of the reasons I've since closed my account (there are others).
My new favorite photo sharing site is SmugMug. They're a little more expensive, but they are totally free of advertising and extremely easy to use. They offer three levels of subscriptions (ranging from $40/yr to $150/yr) to meet various needs. I could go on and on about how great smugmug is, but here are some benefits worth considering:
SmugMug offers a 14 day free trial too so you can easily test drive the site before you buy.
And if you use the coupon code (mlw5t8QahAChE), you'll get $5 off if you decide to buy.
The safe and secure photo sharing alone is reason enough to get a SmugMug account, not to mention the easiest way to share photos with family and friends.
Need Unlimited photo storage- FREE Trial of Smugmug

One of the downsides to emailing photos is file size. With today's digital cameras, photos often range from 1-3 mb in size. With file sizes like these, you don't want to email more than 4 or 5 photos per email. So if you have more photos than this to share, you'll want to send multiple emails to make it easier for the receiver to download them.
Another downside is when you email photos one day, and then decide to email more to somebody else the next. Needless to say, this can be time consuming and a bit of a hassle creating the messages and attaching the photos every time you decide to email photos.
Photo sharing sites are an excellent alternative to emailing photos. Common photo sharing sites include Kodak Gallery
While some of my friends use Snap Fish and others, I've been using Webshots the last couple of years. Webshots has both free and paid subscriptions and is very easy to use. The free account limits you to a 1,000 photos whereas the paid subscription lets you upload unlimited photos and until recently, was free of advertising. However, webshots recently changed hands and since then, even the paid accounts hit you with advertising - which is one of the reasons I've since closed my account (there are others).
My new favorite photo sharing site is SmugMug. They're a little more expensive, but they are totally free of advertising and extremely easy to use. They offer three levels of subscriptions (ranging from $40/yr to $150/yr) to meet various needs. I could go on and on about how great smugmug is, but here are some benefits worth considering:
- You get unlimited photo storage
- Because your photos are stored online, you don't have to worry about losing them if your computer crashes!
- Friends and family can easily view the photos from all over the world (which means you don't have to deal with the headaches of emailing photos anymore!
- Friends and family can easily order prints if they like and other cool photo gifts (mugs, calendars, etc.).
SmugMug offers a 14 day free trial too so you can easily test drive the site before you buy.
And if you use the coupon code (mlw5t8QahAChE), you'll get $5 off if you decide to buy.
The safe and secure photo sharing alone is reason enough to get a SmugMug account, not to mention the easiest way to share photos with family and friends.
Need Unlimited photo storage- FREE Trial of Smugmug
How to Remove Windows Antivirus
Is your computer infected with Windows Antivirus? I recently removed this annoying malware program from many of my client's computers and wanted to share the secret with you.
First let's talk about this program. This malicious program has been around a few years, and as such changes name every year. This year, it's called, "Windows Antivirus 2009". Last year it was "Windows Antivirus 2008", and so on.
If the name wasn't bad enough, another problem is that this program disguises itself to look like a legitimate Microsoft program (which it isn't). The icon even looks like a windows icon.
You've heard of "adware" and "spyware" ... well this program can be termed, "malware", "rogue-ware", or "ransomware". In short, it's a malicious program that infects your computer and holds it hostage for money (Perfect Defender is another rogue program)
Folks tend to get it by surfing the web stumbling across a web site that is infected or responding to a scary popup message. Once this program is on your computer, it will bombard you with scary messages about many infections are on your computer and convince you need to buy the program to remove them. But sadly, even after paying your $50 for the program, the messages never go away - and you're still left with the annoying problem and out $50!
By the way, there's no hope of recovering your money from the folks behind Windows Antivirus .... but you can call your credit card company and tell them you're a victim of an internet scam and have them cancel the payment.
Good news is that there is hope! There is a program that remove Windows Antivirus 2009 (and other versions of it) from your computer. This program is called, Anti-Malware by Malwarebytes. I've used this program on some of my clients computers and it worked like a charm .... which is why I highly recommend others use this program!
Updated 28 September 2009: In addition to Windows Antivirus, this program also goes by the names, Alpha Antivirus, Perfect Defender, and a dozen or so other names. But all warning messages look and act pretty much the same way.
How to Email Photos in Yahoo
Emailing photos in Yahoo is pretty much like emailing photos in other programs. The steps are pretty simple - although it's worth noting that in Yahoo, you can only attached 5 photos in a single email. So if you have more than 5 photos to email, you'll have to send more than one email.
Just follow the steps below to email your photos in Yahoo:
Just follow the steps below to email your photos in Yahoo:
- Login to your Yahoo email account and create a new blank message. You can go ahead and address the email, fill in the subject line and write your message now or wait til you're done attaching photos.
- Under the "subject" line, you'll see a gray button that reads, "Attach Files" (there's a paperclip on it). Click this button.
- On the next screen, click the "Browse" button (this is where it gets a bit tricky)
- When you clicked the "Browse" button in step 3, a new window popped up. This window allows you to find your photos so that you can attach them to the email. Everybody stores their photos in a different place, but in most cases, you can start your search in the "MY PICTURE or "PICTURE" folder. From there, you might have to look in subfolders to find the images you'd like to email.
- Once you find the image you want to email, single click it once (to highlight it) and then click the OPEN button the browse window. Repeat the process attach more photos (remember that you can only attach 5 photos to an email).
- When you're done attaching photos, click the ATTACH FILES button (found below all the Browse buttons).
- Complete the message and send.
Stay Tuned for More ...
In order to help maximize the amount of information I have to share with my new and existing clients, I've decided to start this blog. My goal will be to share valuable information regarding common computer problems, changes in technology, etc.
I get loads of questions every day and will do my best to post the answers here too - so that everybody can benefit.
So stay tuned for more ....
I get loads of questions every day and will do my best to post the answers here too - so that everybody can benefit.
So stay tuned for more ....
Subscribe to:
Posts (Atom)