 This morning I was asked how to insert new worksheets into an Excel spreadsheet and I wanted to post the answer here to share with everybody.
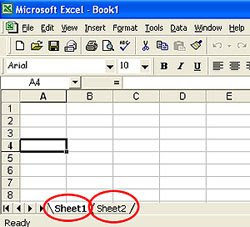
When you create a new Excel document, it contains 2 or 3 worksheets by default (normally labeled, "sheet1", "sheet2", etc.). You'll see the worksheet tabs at the bottom of your new document. You can rename these worksheets, delete them, or add more depending on your needs.
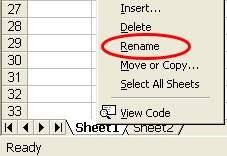
To Rename a Worksheet, RIGHT click on the worksheet name and select RENAME. You'll notice that the name of the worksheet is now highlighted in black. You can delete the old name and type a new one or just type
 over the black highlight. Be sure to hit the "enter" key when done to save the new name.
Notice that when you RIGHT clicked on the worksheet name, there were other choices besides rename. You could INSERT a new worksheet, DELETE a worksheet, MOVE or COPY a worksheet, and SELECT ALL worksheets.
This is the easiest way to insert, delete and move/copy worksheets. Just follow the rest of the prompts after clicking the appropriate action.
Besides RIGHT clicking on a worksheet and selecting INSERT, you can also insert a new worksheet by selecting INSERT > WORKSHEET on the document's menu.
To delete, move or copy worksheets using the menu, select EDIT and then the appropriate action.
By the way, you can also rearrange worksheets by holding the left mouse button down on a worksheet name and dragging it to where you want it (then let go of the mouse button).
That's all there is to it.

No comments:
Post a Comment