A lot of my clients struggle using Microsoft Word, so I thought I'd offer some helpful links below.
Hopefully the links above will be helpful to you in figuring out how to use Word effectively!

Showing posts with label microsoft word. Show all posts
Showing posts with label microsoft word. Show all posts
Saturday, January 21, 2012
Friday, September 17, 2010
How to Insert Pictures into Microsoft Word
A lot of my clients have asked me how to insert pictures into a Microsoft Word document. While the process is simple, explaining it in steps takes a bit of time. So today I wrote up in the instructions (complete with pictures) on the Genealogy Help Zone web site.
As you look over the instructions, keep in mind that they were specifically written for Microsoft Word 2000. However, the steps will be very similar for other versions of Microsoft Word, especially those version that were pre-2007.
The instructions will also be similar for other types of word processing programs (Works, Open Office Writer, etc.), although the steps may vary a bit. For help inserting pictures into Works Word documents, click here.
None the less, if you'd like to see how to insert photos into Microsoft Word, click here.
Saturday, April 25, 2009
Insert & Overwriting Type in Microsoft Word
Unless you're a perfect typist, chances are you often need to go back and correct your typing in Microsoft Word. One of the greatest advantages over using a word processing program like Word (compared to the old typewriter days) is having the ability to go back and insert words or correct spelling without messing up the rest of a sentence. But sometimes, the "insert" feature gets inadvertently turned off and "overwrite" is turned on.
The "insert" feature in Microsoft Word allows you to go back in a sentence or paragraph and insert more type or characters. By default, this feature is usually turned on. When it is on, you'll see the letters "OVR" grayed out at the bottom of your Word document (in the beige status bars).

The "overwrite" feature in Word does the exact opposite of "insert". When "overwrite" is enabled, you can still go back and edit text, however instead of inserting text, you'll now overwrite existing text (i.e., replace existing text with new text). When the "overwrite" feature is turned on (which means "insert" is turned off), the characters OVR in the status bar will be black.

Most folks like the "overwrite" feature to be turned off so that they can go back and insert text later. But sometimes, it gets turned on by accident and they don't realize it until they try and go back and edit text.
So the next time you're typing along and notice that you're overwriting text as opposed to inserting text, glance down at the status bar and check the characters OVR to see if it's grayed out or black. If it's grayed out, you know that the "insert" feature is turned on. And if it's black, then you know the "overwrite" feature is turned on.
You can easily turn these features on and off by hitting the "insert" key on your keyboard. Go ahead and test this. Open a word document and check the status OVR. Then hit the "insert" key on your keyboard and watch it change. Then hit the "insert" key again on your keyboard and watch it change again.
When you're through testing this feature, it's best to leave "overwrite" off (which means OVR will be grayed out).
That's all there is to turning this feature on and off.
Saturday, April 18, 2009
How to get your Toolbars Back in Word
Ever lost your toolbars in Microsoft Word or Excel? It's happens sometimes by accident when "fat-finger" some keys on the keyboard.
Good news is that they're really easy to get back. "Standard" and "Formatting" are the two toolbars that most people like to have shown. To get them back, follow the steps below:
Rather than follow the steps above, you can also disable and enable toolbars in Word by RIGHT clicking on the beige space under the menu (where the toolbars are, or are supposed to be).
Keep in mind that these steps tend to work in other programs too (like Excel, PowerPoint, and others). So if you ever lose your toolbars, give these steps a try.
Good news is that they're really easy to get back. "Standard" and "Formatting" are the two toolbars that most people like to have shown. To get them back, follow the steps below:
- Open Microsoft Word
- On the menu, select VIEW and then TOOLBARS
- Click on STANDARD to put a checkmark by it (this makes the toolbar visible)
- Repeat step 2 and select FORMATTING to put a checkmark by it
Rather than follow the steps above, you can also disable and enable toolbars in Word by RIGHT clicking on the beige space under the menu (where the toolbars are, or are supposed to be).
Keep in mind that these steps tend to work in other programs too (like Excel, PowerPoint, and others). So if you ever lose your toolbars, give these steps a try.
Friday, December 12, 2008
How to Insert Pictures into Word
Tis the season that everybody is writing their Christmas letters to friends and family. While I'm sure everybody appreciates the "year in review" letters, how about adding some pictures to spice them up a bit. As they say, pictures are worth a 1,000 words ...
Below are the steps on how to add pictures to Microsoft Word documents. The steps are similar for adding images to other documents as well (like Works and Word Perfect), although the options to format the picture may be different.
The first step is to open the document that you wish to insert the picture into.
Then on the menu, select INSERT, then PICTURE, then FROM FILE (note you could add a pictures from clipart too). Browse to find the picture you want to insert and ready, click it and click the INSERT button.
The next step is to position the picture where you’d like it to appear. To do this, double left click the picture to open the Format Picture window.
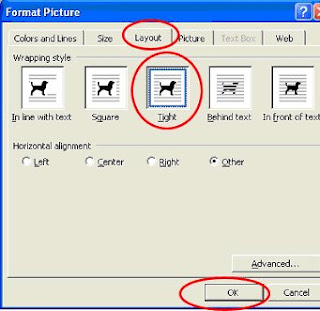
On the new window, click the LAYOUT tab and then click the TIGHT box. Click the OK button to close window.
Now you can drag the image wherever you like, by holding the left mouse button down and dragging the image. Release the buttons to leave the image where it is.
Notice that text will wrap around the image with the “tight” setting. You have other options in the Format Picture window if you don’t want this. You may also have to hit the carriage return (or Enter key) to move the text so it looks right on the page.
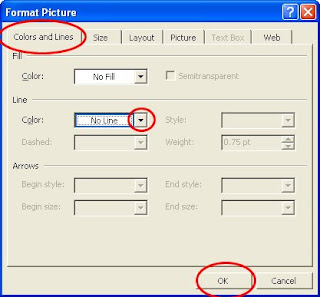
Feel free to experiment with the options in the Format Picture window. If you click the COLORS and LINES tab, you can add a border around the image (to frame it) if you like. In my experience, this option is not available until you follow the steps on the Layout tab first.
Below are the steps on how to add pictures to Microsoft Word documents. The steps are similar for adding images to other documents as well (like Works and Word Perfect), although the options to format the picture may be different.
The first step is to open the document that you wish to insert the picture into.
Then on the menu, select INSERT, then PICTURE, then FROM FILE (note you could add a pictures from clipart too). Browse to find the picture you want to insert and ready, click it and click the INSERT button.
The next step is to position the picture where you’d like it to appear. To do this, double left click the picture to open the Format Picture window.
On the new window, click the LAYOUT tab and then click the TIGHT box. Click the OK button to close window.

Now you can drag the image wherever you like, by holding the left mouse button down and dragging the image. Release the buttons to leave the image where it is.
Notice that text will wrap around the image with the “tight” setting. You have other options in the Format Picture window if you don’t want this. You may also have to hit the carriage return (or Enter key) to move the text so it looks right on the page.
Feel free to experiment with the options in the Format Picture window. If you click the COLORS and LINES tab, you can add a border around the image (to frame it) if you like. In my experience, this option is not available until you follow the steps on the Layout tab first.

Subscribe to:
Posts (Atom)